Search Knowledge Base by Keyword
Users
In SpreadsheetWEB, there are two types of users: public users and named users. A web application can be made publicly accessible by changing its Access Type to Unrestricted (All newly created web applications are Unrestricted by default). An Unrestricted (or public) application can be accessed by any number of public users or named users. However, the records created by public users (those accessing the application without logging into their SpreadsheetWEB account) will show as Anonymous in the user details and these users will not be able to access their saved data at a later time.
Both Restricted and Restricted with Registration access types will require users to login to their SpreadsheetWEB accounts. Named users can then access their records by logging into their accounts. Users with an account count towards your named users limit set by your license.
Named Users
The number of named users allowed is determined by your SpreadsheetWEB account type. In our Public Cloud accounts, the number of named users allowed by your license is as follows,
| Edition | Number of Named Users allowed |
| Individual Edition | 1 |
| Team Edition | 5 |
| Professional Edition | 20 |
| Enterprise Edition | 100 |
Note: The numbers above denotes the maximum number of users including the site admin. For example, the Trial edition allows no additional users while the team edition allows for four additional users.
Users management menu can be accessed under Tools.

User Roles
System Administrator – The owner is the site admin with all rights. By default, the owner has access to all account features and configurations. Only the system administrator can access some account-wide features, such as the Administration panel. Note: there can only be one system administrator account.
Admin – Can create and delete web applications, can create, edit and delete users and groups. The Admin can open and run any web application.
Standard User – Can create and delete web applications and can open and use them but cannot manage users and groups.
Limited user – Can open and use web applications with restricted access but cannot create, edit or delete web applications. Also the Limited User cannot manage users and groups.
Limited user with no access to Data Tab – Can open and use web applications with restricted access but cannot create, edit or delete web applications and cannot access the Data Tab. Also the Limited user with no access to Data Tab cannot manage users and groups.
Limited user with no access to Applications Tab – Can open and use web applications with restricted access but cannot create, edit or delete web applications and cannot access the Applications Tab. Also the Limited user with no access to Applications Tab cannot manage users and groups.
Guest User – Has no access to the Control Panel, can only access one application by the URL. The Guest User will be required to register when they try to reach the application for the first time. Guest User can be managed through the User Tab.
Guest User with Data – Has no access to Control Panel, can only access one application by the URL and can access their own data from the previous login. The Guest User with Data will be required to register when they try to reach the application for the first time. Guest User with Data can be managed through the User Tab.
Users Tab Controls
|
|
Edits the user. |
|
|
Suspends/unsuspends the user for blocking/allowing access temporarily. |
|
|
Unlocks the account and reset password attempts. |
|
|
Removes the user. |
Creating Additional Users
To create additional users go to the Users tab under Tools and click Add New User.
![]()
In the Add a New User page, enter the user’s details.
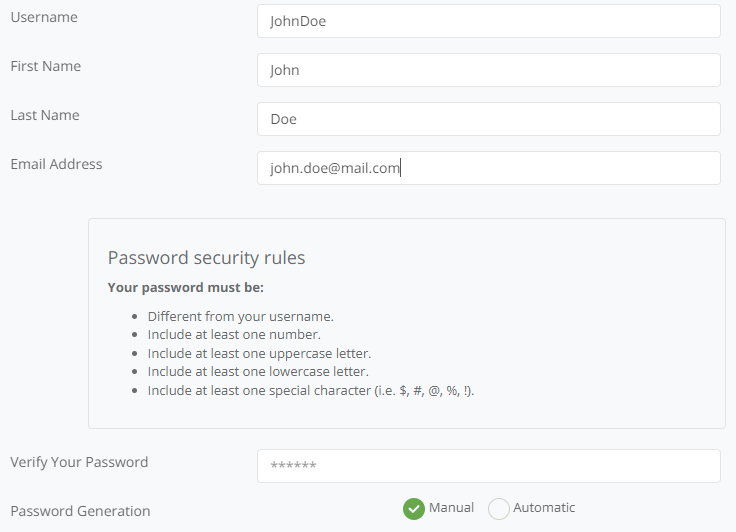
Password Security Rules – This is the list of security requirements for account-wide password generation. The assigned user password must adhere to the rules listed here. These settings can only be changed by the systemadmin user.
Verify Your Password – You must verify and enter your own password (the user you are logged in as) when creating or editing a user in the system.
Password Generation – Manual option will allow you to enter a password manually, while the Automatic option will auto-generate a randomized secure password.
New Password – Enter the desired password for the user. If you selected Automatic for the Password Generation field, this field will automatically populate a secure password that you can edit.
Confirm New Password – Re-enter the desired password for the user to confirm.
Password Reset (at Next Login) – Enabling this option will prompt the user to reset their password upon first login.
Send Email – Enabling this option will send the user information as an email to the address specified under Email Addressfield.
Language – You can select from available language sets to give this user a localized interface.
User Role – Determines the user rights; which sections of the Control Panel and applications they can access.
Member of Groups – You can manage application restriction by assigning users and applications to Groups. All applications and users need to be assigned to at least one group. Matching group properties will allow access between the users and applications.
Changing the User Type
To change the user type, go to the Users tab in the navigation menu. Next, go to the user in the table and click the ![]() button in the same row. A new page will open with a table that lists the user specific settings. Go to user role and activate the option button next to the user type you wish to select for your user.
button in the same row. A new page will open with a table that lists the user specific settings. Go to user role and activate the option button next to the user type you wish to select for your user.
Edit User Details
To change the user’s details, go to the User tab under Tools. Then, go to the user in the table and click the ![]() button in the same row. A new page will open with a table that lists the user specific settings. You can change also edit the user’s password here.
button in the same row. A new page will open with a table that lists the user specific settings. You can change also edit the user’s password here.
Assigning a User to a Group
To assign a user to a group or groups, click the Users tab under Tools. Go to the user in the table and click the ![]() button in the same row. A new page will open with a table that lists the user specific settings. Go to Member of Group and from the combo box select the group or groups that you wish to assign the user to.
button in the same row. A new page will open with a table that lists the user specific settings. Go to Member of Group and from the combo box select the group or groups that you wish to assign the user to.