Search Knowledge Base by Keyword
DocuSign
The DocuSign Connector allows you to upload documents created with Print processes to DocuSign electronic signature platform in order to start the approval process with eSignatures.
Once the DocuSign Connector is created and validated in the Designer application, it can be attached to a button from the Events selection of the button in the User Interface Designer.
Properties
The section below will outline the properties for the DocuSign Connector.
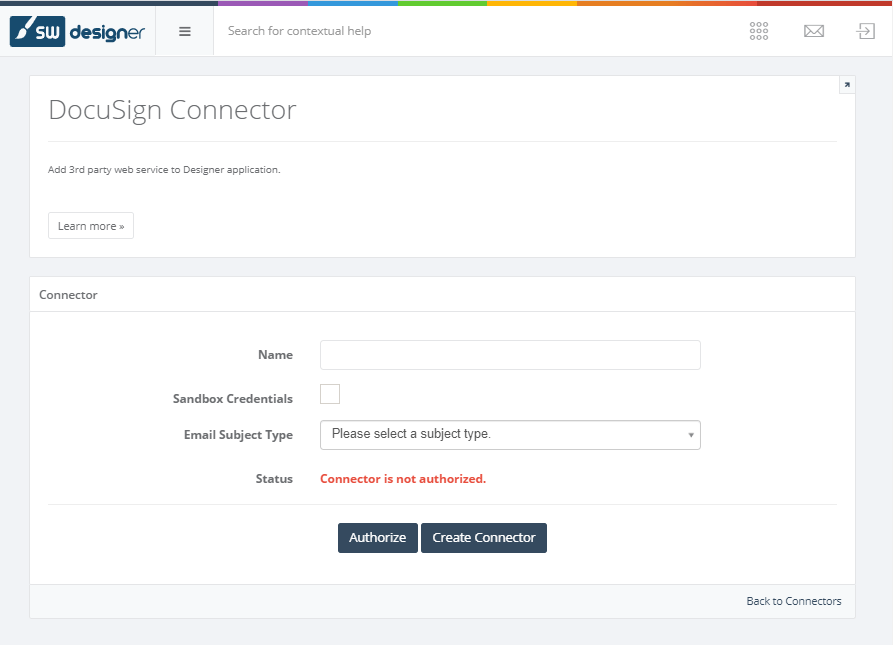
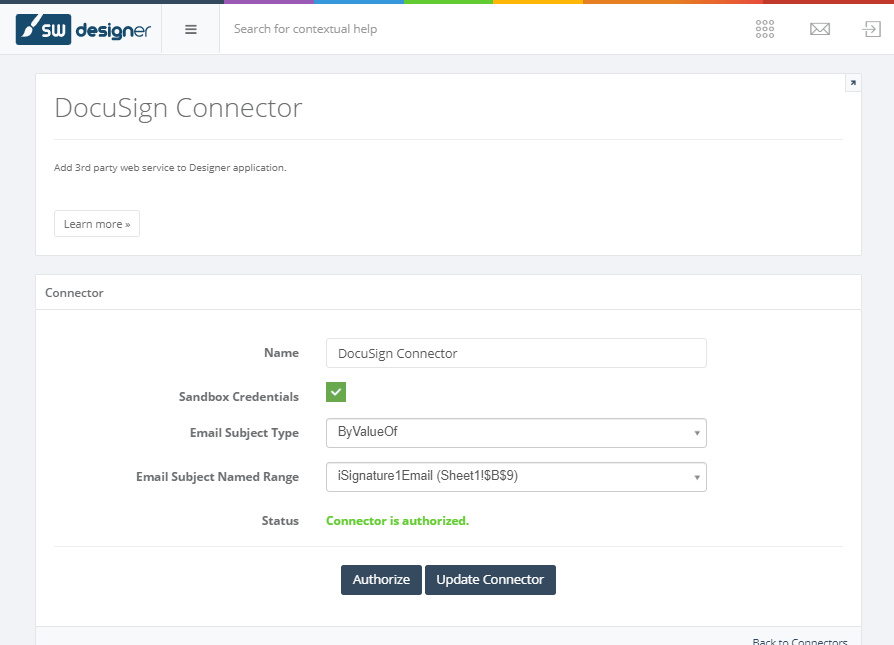
Name
The Name is simply a friendly identifier provided to the connector to help you subsequently identify this event.
Sandbox Credentials
The Sandbox Credentials determines the target Docusign server to be used by the connector. If it is checked, the connector will use demo.docusign, otherwise the production server will be used.
Email Subject Type
This defines whether the contents of the email subject should be static in a pre-defined format, or retrieved dynamically from a Single Named Range (SNR).
The corresponding values are as follows:
- Static – The contents of the email subject can be defined using the textbox that will become available for the email subject upon selection of this option.
- Dynamic – The contents will be dynamic, based on a Single Named Range (SNR) from your workbook. You can select this named range from the Email Subject Named Range dropdown list, which will become visible upon selection of this option.
DocuSign Application Authorization
Once an DocuSign Connector is created, it will require authorization before it can be utilized. You need to click the Authorize button which will take you to the DocuSign application authorization page.
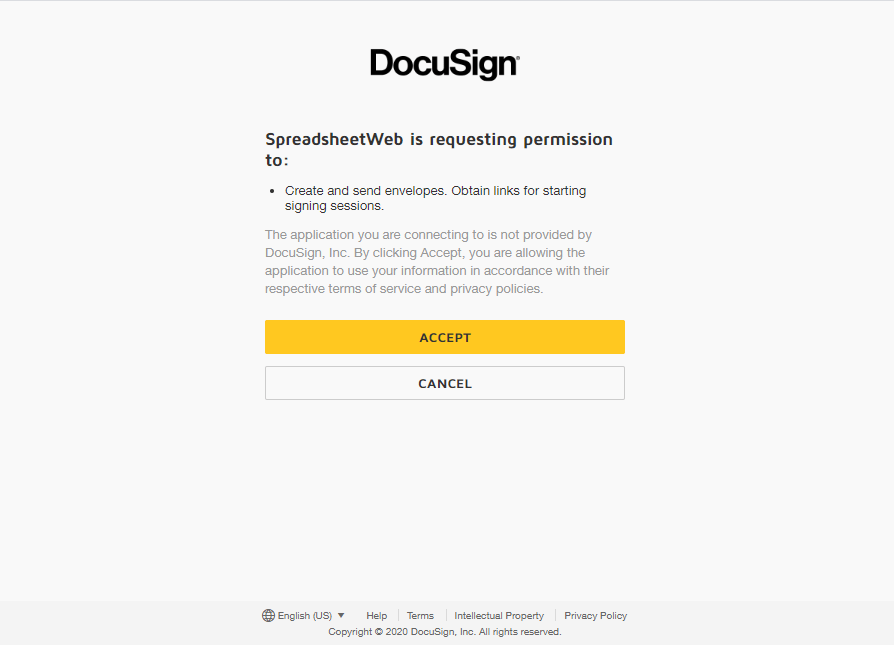
When you give authorization to the application, you will be returned to the Designer, and the authorization will be complete.
Please note that, when you edit a previously authorized DocuSign Connector, any changes made to the Integration Key, Secret Key or Sandbox Credentials will invalidate the connector, and you will need to do the authorization process again.
Docusign Connector Inputs
The section below will outline the inputs that are needed for the DocuSign Connector.
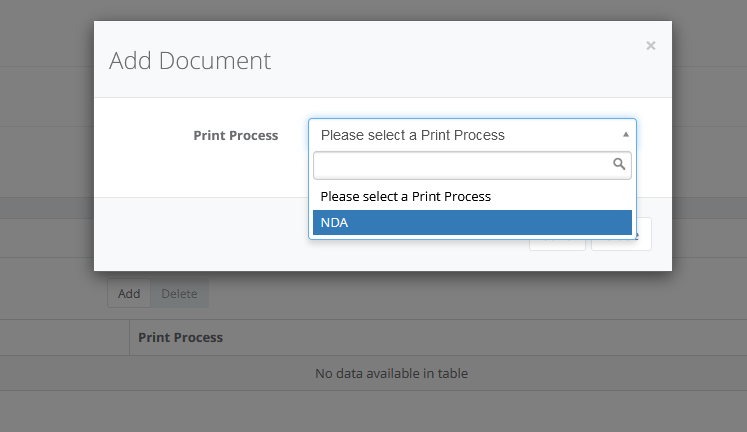
Documents
Documents will contain the Print processes that are added to the connector. Added Print process outputs will be included in the Docusign Envelope that will be sent out for approval. You can Add a new process or Delete the process selected in the grid by using the Grid Action Buttons at the top of the Documents grid.
Please note that, at least one Document must be added to the connector.
Print Process
All available Print Process in the Designer Application will be added as an option to this dropdown. Selected Print Process will be added to the connector.
Recipients
Recipients will contain the recipients that are added to the connector. Documents in the Docusign Envelope will be sent out for approval to recipients that are added here. You can Add a new recipient, Edit the recipient selected in the grid or Delete the recipient selected in the grid by using the Grid Action Buttons at the top of the Recipients grid.
Please note that, at least one Recipient must be added to the connector. Any recipients added into this list will become available to select as Target Recipient on the Tab Bindings step as described in the next section.
Recipient Email Type
This defines whether the recipient email address should be static, or retrieved dynamically from a Single Named Range (SNR).
The corresponding values are as follows:
- Static – The recipient email address can be defined using the textbox that will become available upon selection of this option.
- Dynamic – The recipient email address will be dynamic, based on a Single Named Range (SNR) from your workbook. You can select this named range from the Recipient Email Named Range dropdown list, which will become visible upon selection of this option.
Recipient Name Type
This defines whether the recipient name should be static, or retrieved dynamically from a Single Named Range (SNR).
The corresponding values are as follows:
- Static – The recipient name can be defined using the textbox that will become available upon selection of this option.
- Dynamic – The recipient name will be dynamic, based on a Single Named Range (SNR) from your workbook. You can select this named range from the Recipient Name Named Range dropdown list, which will become visible upon selection of this option.
Routing Number
This option determines the order of recipients. The recipient with the Routing Number 1 will receive the DocuSign document first, 2 will receive it next, and so on. You can assign the same Routing Number to multiple rows in Recipients, but each recipient must have a different email. This way, you can have multiple recipients assigned to a specific step in the signing process, meaning that all recipients with the same Routing Number must sign the document before the process continues on DocuSign with the next Routing Number.

In the example above, the client receives and signs the document first. Then, Pagos and SpreadsheetWeb Support receive the document at the same time and the process is completed when both sign the document.
Tab Bindings
Tab Bindings will contain the document stubs that are added to the connector which will be used as placeholders for eSignature fields. Tab bindings in the Docusign Envelope will determine the eSignature fields and which recipient will sign these. You can Add a new tab binding, Edit the tab binding selected in the grid or Delete the tab binding selected in the grid by using the Grid Action Buttons at the top of the Tab Bindings grid.
Please note that at least one Tab Bindings should be added to the connector.
Target eSignature Stub
All available Document Stubs with an eSignature type assigned (further details in the Print Process Designer -> Edit Document Stubs section of the help pages) in the Print Processes added to Documents in the connector, will be added as an option to this dropdown. Selected stub will be assigned to the Tab Binding. This means the eSignature field will be added based on the position of the selected Document Stub.
Target Recipient
Recipients defined in the previous section (Recipients) will be available in this dropdown. Selected Recipient will be assigned to the Tab Binding.