Search Knowledge Base by Keyword
Calendar
A calendar control is a basic control that allows user to select dates and/or times for data entry. Each calendar control must be associated with a Single Named Range (SNR) in the workbook.
Named Range
A list of all Single Named Ranges (SNR) from the workbook. The value entered into this input will be sent to the calculation engine, as if the user entered the value into the spreadsheet model.

Selecting a named range from the list may default some of the other calendar control properties based on some metadata captured from the spreadsheet model, such as the default value.
Named ranges containing formulas are excluded from the list, as well as named ranges that have already been bound to a different input in your user interface.
Enable Formula Override
This option becomes available only if you select a Name Range that contains a formula.

Enabling this option allows the formula result in the control to be overwritten. This essentially means that users can set a new value for this control during runtime, and the associated formula will not change the cell value once edited.
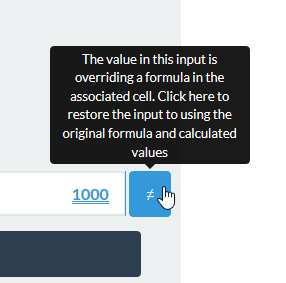
If a cell with Enable Formula Override is edited, a button will become available right next to the cell, that can be used to clear the formula override and revert the value of the cell back to the original fomula-based calculated value.
Force Override on Save
This option becomes available only when Enable Formula Override is enabled, and the Name Range selected for the control contains a formula. Using this option is limited to the scenario in which the published application has an Action Button control with Save event.
When you Save a record in the published application, each control that has Force Override on Save option enabled will save its current value, and override the formula at the same time, even if you haven’t overwritten the value in the control manually. Force Override on Save option does that automatically when the record is being saved.
Name
The Name property constitutes the label that will appear in the user interface. Other properties, such as Placeholder, will also derive their dynamic {FriendlyName} value from this property.

Placeholder
The Placeholder property defines the text that will be visible in the calendar control when no input has been entered. This will only appear if no default value is selected or if the user clears the input’s value.

This property supposed the special {FriendlyName} tag to insert the value of the Name property into the placeholder.
Size
The Size property denotes the size of the calendar control in the user interface. Note that altering the style of calendar controles via Cascading Style Sheets (CSS) may affect whether or not the size property is visibly relevant in your published application.

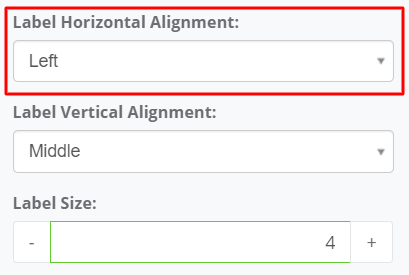
Label Horizontal Alignment
The Label Horizontal Alignment property determines the horizontal orientation of the label. This value can be set to Left, Center, or Right. The default horizontal alignment is Left.
Label Vertical Alignment
The Label Vertical Alignment property determines the vertical orientation of the label. This value can be set to Top, Middle, or Bottom. The default vertical alignment is Middle.

Label Size
The Label Size property is the spacing distribution of the input control’s label vs. the input control. The maximum width of both controls cumulatively is considered to be 12 – a width of 12 for the label would indicate that the label occupies a full row within its container and the input control occupies a full row beneath it.

Any label distribution below 12 will indicate that the label and the input control occupy the same row in the user interface. The label’s width will be used to calculate the control’s width such that the two controls cumulatively occupy the full width of 12.
For example, setting the Label Size to 6 will indicate that the control width is also 6. This means the label will occupy 50% the width of the row and the control will occupy 50% the width of the row.
Likewise, setting the Label Size to 3 will indicate that the control width is 9, meaning that the label will occupy 25% the width of the row while the input control occupies 75% the width of the row.
Setting the Label Size to 0 will hide the label in the user interface.
Default Value
The Default Value property specifies the value that will be visible in this calendar control when the user interface is first loaded. This property may have a suggestion populated if the target named range for the calendar control includes a default value.

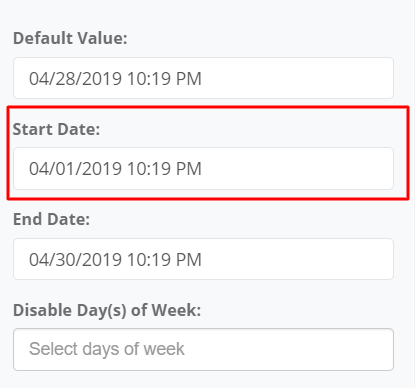
Start Date
The Start Date property specifies the first day or first time can be selected from calendar control. Start date cannot be greater than Default Value. If you are going to use calendar control as time picker and you want to define start time and end time that user can select from time picker you need to set same date as Start Date and End Date, then you can set time for time picker control.
End Date
The End Date property specifies the last day or last time can be selected from calendar control. End date cannot be less than Default Value

Disable Day(s) of Week
The Disable Day(s) of Week property specifies day(s) that will not allowed in user interface. You can’t select more than 6 days to disable days.

Tooltip Type
Tooltips are informative message boxes that are displayed when you mouse-over or click on a control. The Tooltip Type property determines the message style, and when the information will be shown.
- Tooltip: The content will appear in a small bubble when the user enters focus on the target input by moving their mouse over the control.
- Popover: The content will appear in a pop-up box when the user clicks on the target input.

Tooltip Content
This property accepts the special {FriendlyName} tag if you want to insert the value of the Name property of this control into the tooltip.

Tooltip
The Tooltip Content property determines the information that will appear in the tooltip bubble.
Popover
The Tooltip Content property determines the information that will appear in the popover message.

Clicking on the Edit Content button will launch an instance of a rich-text editor that supports HTML code. The editor includes a simple menu for inserting certain control sets such as tables, lists, images, videos, and links, as well as text formatting controls, such as boldness, highlighting, and font.
Modifying the HTML Content
Clicking on the HTML (</>) button will change the the editor to HTML-mode. In this mode, you can enter your own HTML code, including references to classes that are defined in the Stylesheets module. Click the ‘X’ button in the right corner to close this window and save your changes.

Styles that are defined in the Stylesheets module will not be visible in the User Interface Designer view of the application. These stylesheets are only loaded during the Preview and Published versions of the application.
Note that scripts that are injected into the HTML will be stripped from the contents control.
Dynamic Content Injection
The value of calculated, and input named ranges can be injected directly into the HTML contents of the popover.

All dynamically injected variables must be entered inside double curly braces – {{ }}. To inject a variable into the contents, begin by entering double curly braces, and the system will automatically display available fields.
Single Named Ranges
When you enter double curly braces, you will see a list of Single Named Ranges (SNR). Selecting one of these from the list will populate the name of the named range in the contents.

Several formatting options are available when injecting the value of a Single Named Range (SNR). To use any of the formatting options, simply type in a colon character (:) after the name to see a list of supported data types. If you don’t apply any formatting, the name will be injected as an unformatted value.

The data types (Integer, Decimal, DateTime, or Text) are necessary to determine the format of the field. The system will automatically format the value of the Single Named Range (SNR) when you select a data type. The text data type will get the formatted value directly from the calculation engine. Text data type also has an optional paramater (None) for formatting that has no effect on the output.
Upon selecting the data type, add a semicolon character (;) to begin defining the desired format for the output value. The .NET formatting standards apply to this property as outlined below.
- Standard Numeric Formatting
- Custom Numeric Formatting
- Standard Date and Time Formatting
- Custom Date and Time Formatting
Below are some examples.
{{NamedRangeName:Decimal;C2}}
- When NamedRangeName = 12, the formatted value will be $12.00.
- When NamedRangeName = 1.2345561, the formatted value will appear $1.23.
- When NamedRangeName = ‘ABC’, the formatted value will appear blank.
{{NamedRangeName:Decimal;P3}}
- When NamedRangeName = 0.12, the formatted value will be 12.000%.
- When NamedRangeName = 1.2345561, the formatted value will appear 123.457%.
- When NamedRangeName = ‘ABC’, the formatted value will appear blank.
{{NamedRangeName:Decimal;00000}}
- When NamedRangeName = 1234.5678, the formatted value will be 01235.
- When NamedRangeName = 1.2345561, the formatted value will appear 00001.
- When NamedRangeName = ‘ABC’, the formatted value will appear blank.
Predefined Formats
In addition to manual format setting you may also use one of the predefined Numeric or Date and Time Formatting:
Integer (Input value: 1234)
- {{ValueInteger:Integer;00}} => 1234
- {{ValueInteger:Integer;#,##0}} => 1,234
- {{ValueInteger:Integer;00000}} => 01234
- {{ValueInteger:Integer;##-##}} => 12-34
Decimal (Input value: 123456.78)
- {{ValueDecimal:Decimal;0.0}} => 123456.8
- {{ValueDecimal:Decimal;0.00}} => 123456.78
- {{ValueDecimal:Decimal;#,##0.0}} => 123,456.8
- {{ValueDecimal:Decimal;#,##0.00}} => 123,456.78
- {{ValueDecimal:Decimal;0.##}} => 123456.78
- {{ValueDecimal:Decimal;00.00}} => 123456.78
- {{ValueDecimal:Decimal;0,0.00}} => 123,456.78
- {{ValueDecimal:Decimal;0%}} => 12345678%
- {{ValueDecimal:Decimal;0.0%}} => 12345678.0%
Datetime (Input value: 12/05/2018 11:25:07 pm)
- {{NamedRangeName:Datetime;yyyy}} => 2018
- {{NamedRangeName:Datetime;MM}} => 12
- {{NamedRangeName:Datetime;dd}} => 05
- {{NamedRangeName:Datetime;yyyy/MM/dd}} => 2018/12/05
- {{NamedRangeName:Datetime;MM/dd/yyyy}} => 12/05/2018
- {{NamedRangeName:Datetime;dd/MM/yyyy}} => 05/12/2018
- {{NamedRangeName:Datetime;HH}} => 23
- {{NamedRangeName:Datetime;mm}} => 25
- {{NamedRangeName:Datetime;ss}} => 07
- {{NamedRangeName:Datetime;tt}} => PM
- {{NamedRangeName:Datetime;HH:mm tt}} => 23:25 PM
- {{NamedRangeName:Datetime;HH:mm:ss tt}} => 23:25:07 PM
Text
- {{NamedRangeName:Text;None}} : None is an optional parameter
- {{NamedRangeName:Text}} : Will work the same as above
Tooltip Position
The Tooltip Position property determines where the tooltip or popover will be positioned in respect to the target input.

If Auto is selected, the tooltip or popover position will be calculated automatically based on other parameters like the position of the target input, and content of the tooltip or popover.
Trigger Calculations
If Trigger Calculations is selected, changing the value in this input control will trigger a calculation. Calculations perform a server call with all of the inputs from the user interface and populate the output controls with the values from the updated calculation.

In workbooks with complex calculations, enabling calculations may lead to delays in the user experience.
The best practice when determining whether an input should trigger calculations should take into account the following factors:
- Does this input affect any calculated values? If the field is simply informational, then there is no reason to trigger a calculation.
- Does this input affect my user interface? If the field can change the visibility or enabled-ness of pages or other controls, then it is a good idea to trigger calculations when changes occur to the input.
- Will something else trigger calculations before this input is relevant? If the user won’t see the results of the calculations until reaching a different page, then you can hold off on triggering calculations until a button press or a different control’s value is changed.
Date/Time Format
The format field will determine the masking of the value entered in the control, as well as the available picker controls when the field is focused.

Available options are as follows:
- US Format
- International Format
- Time Only

Enabled
Indicates whether the calendar control field is enabled.

This can be configured as Always or Never to indicate whether the input is statically enabled or not.
Alternatively, if any Boolean Single Named Ranges (SNR) exist (i.e. ranges pointing to a single cell that evaluates to TRUE or FALSE), then the enabled-ness of the input can be configured to reflect the value of that named range using the ‘By Value Of’ setting.
Visible
Indicates whether the calendar control field is visible.

This can be configured as Always or Never to indicate whether the input is statically visible or not.
Alternatively, if any Boolean Single Named Ranges (SNR) exist (i.e. ranges pointing to a single cell that evaluates to TRUE or FALSE), then the visibility of the input can be configured to reflect the value of that named range using the ‘By Value Of’ setting.