Search Knowledge Base by Keyword
monday SpreadsheetWeb
For only using spreadsheet calculations
You can use this method if you only want to utilize the spreadsheet calculations powered by your SpreadsheetWeb API application.
1. Upload your Excel File to SpreadsheetWeb
Let’s assume we have complex Excel file to calculate shipping costs for a specialized equipment delivery. Sales people need to run this Excel file to calculate shipping cost and add it to their quotes. They enter Origination ZIP, Destination ZIP, and Weight. It calculates the shipping cost through various calculations built into the Excel file. Instead of running these calculations in Excel, we want this application available inside monday.com. We also want Destination ZIP to come directly from a contact’s postal code in monday.com.

First, upload this Excel file to your SpreadsheetWeb account. Let’s assume you signed up for a trial account. Login to your trial account and press Create Application button. Drag and drop the Excel file and press Next:

Select Access API on the next screen:

Copy API Endpoint and Application Key. You will need them later.
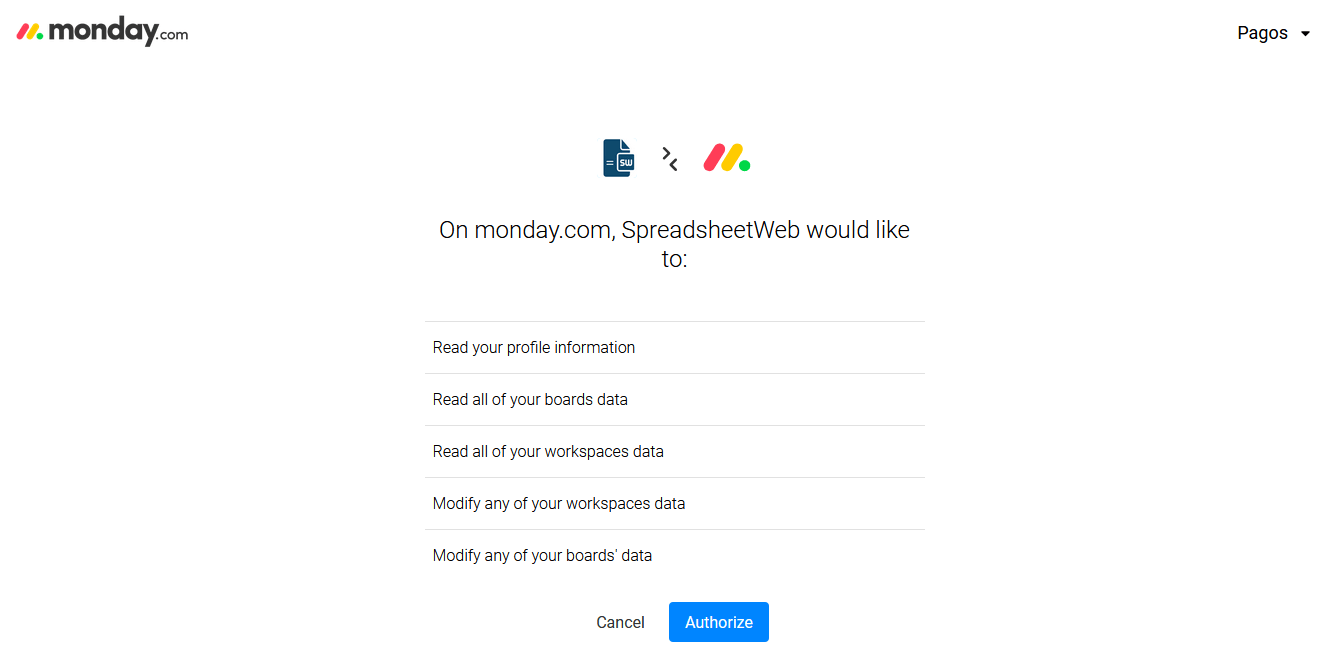
2. Install SpreadsheetWeb from monday.com App Marketplace
Simply login to your monday.com account. Go to App Marketplace, search and install “SpreadsheetWeb”. Click Authorize when prompted. SpreadsheetWeb will be added to the active board.
3. Create your monday.com Application
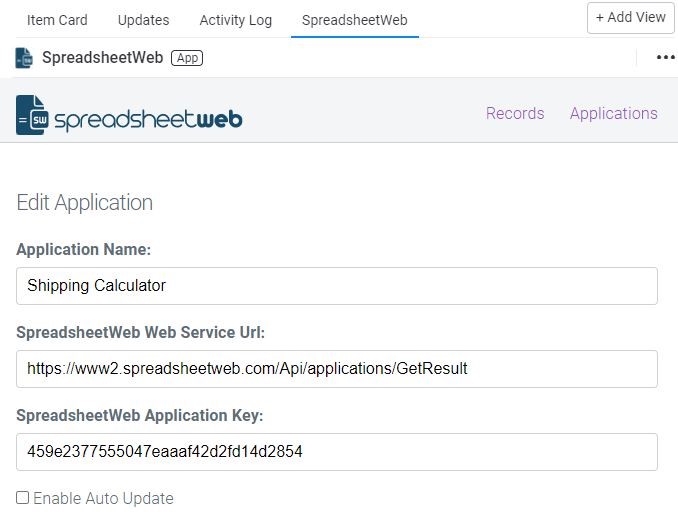
Go back to your monday.com board that SpreadsheetWeb was activated. Select one of the rows. Find SpreadsheetWeb view and select Applications.

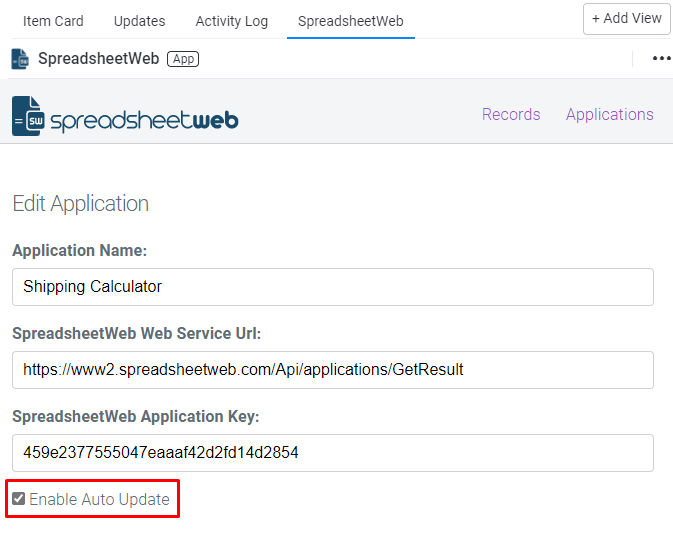
This will load the Applications list. Press Add New Application button to create your first application. Enter the name for your application. Then copy and paste the API Endpoint and Application Key fields from Step a. This is how the application will match your monday.com application to the Excel file running on SpreadsheetWeb.
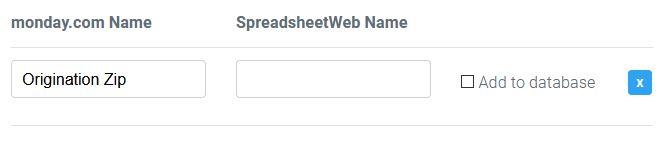
Next step is to add inputs and output and map them to the Excel file. Press Add New Input and enter a name as monday.com Name. This is the name that will appear in your application. Enter the cell name from Excel file as SpreadsheetWeb Name. If there is no name defined for that cell, you can also enter the cell reference i.e. Input!B2. But make sure the cells match the Excel file. If you want to store this data in monday.com select checkbox Add to database. This will create new columns to your board.
If an input field already exists in your board, you can click Add Existing Input button and select it from dropdown list. Once you are done entering inputs, press Add New Output button. Enter a monday.com Name. As SpreadsheetWeb name, make sure to enter that formula cell’s name i.e. cost, or its cell reference Input!B7. You can select Add to database to store this field in your board. Finally, press Save to save the application.
Congratulations! You have just created your first application.
4. Run your monday.com Application
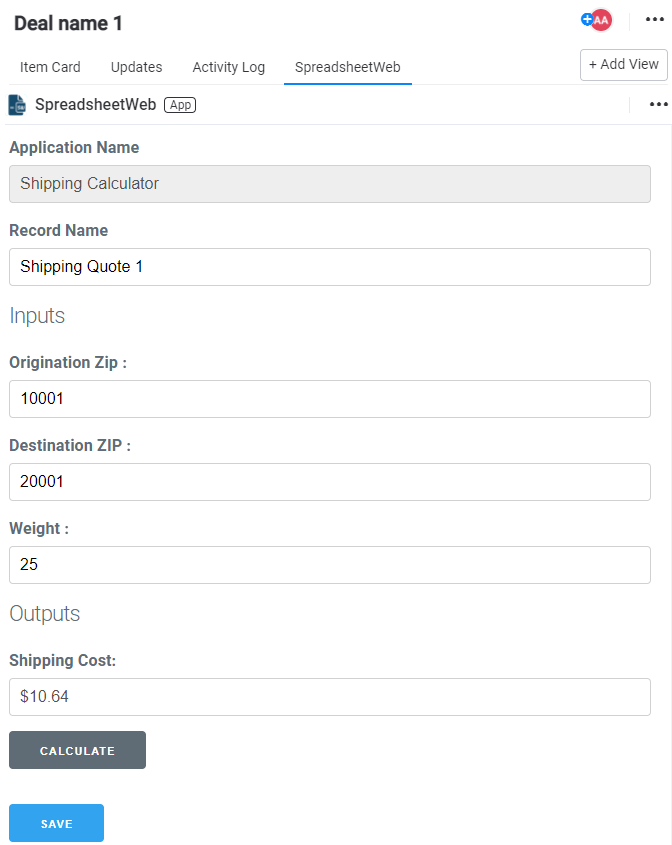
Now that you’ve created your first application, next step is to run it. Click on an item in the board. Go to SpreadsheetWeb view and select Records.

Hit Create New Record button. This will load the application selection page. Select Shipping Calculator and your new application will load. Enter a record name to represent this particular analysis to differentiate multiple quotes you may generate for the same item. Enter Origination Zip, Destination Zip, and Weight inputs. Then press Calculate. This will send all inputs to SpreadsheetWeb and return the calculated cost to be populated in Cost box. You can change inputs and press Calculate to rerun the calculations as many times as you want. When done press the Save button to save this information.
The saved data is also available under the item’s columns as seen below. Note that only column selected “Add to Database” will appear here.

5. Enabling Automatic Calculations in your monday.com Board
In addition to executing spreadsheet calculations through your monday.com application, you can also enable automatic calculations directly in your monday.com board. In order to enable this you must select the Enable Auto Update checkbox on application setup page.
If Enable Auto Update is selected for an application and there is already a saved record for the same application in a item, you can trigger calculations and see the results directly in your board. For example, if you update the Weight value for Deal name 2, its Shipping Cost will be updated automatically.
