Creating an Application
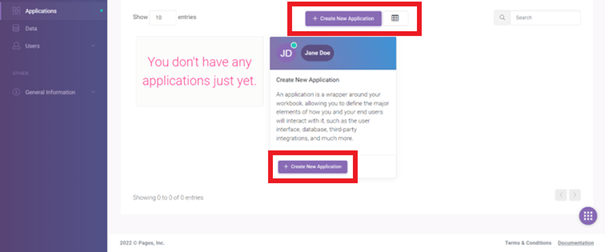
To create a new application, after logging into your account, click on Applications from the menu.

On the opened page, there are two Create A New Application buttons. Click on one of them.
Make sure that your workbook contains Named Ranges before you upload it, because the Designer will make reference to Named Ranges. If your workbook doesn’t have any named ranges, you will get an error in the designer interface. To utilize a cell or series of cells in the Designer, you must first define that range as a Named Range in Excel. As a result, it is very important that you go through your workbook and identify inputs and outputs before beginning the development process. Below is a breakdown of the three types of named ranges.
- Single Named Ranges (SNR) are ranges that refer to a single cell. These ranges are 1 x 1 (Width x Height) and have clearly identifiable types. For example, you may see reference to Boolean Single Named Ranges, which are SNRs that evaluate into TRUE or FALSE. These are the baseline for binding any single columns on a database table or single inputs, such as Textboxes or Calendars.
- List Named Ranges (LNR) are ranges that refer to a one-dimensional set of cells. These ranges are N x 1 or 1 x N (Width x Height) and are most commonly utilized in defining lists of various types throughout the system, such as those associated with Radio Button Lists or Dropdown selection values.
- Table Named Ranges (TNR) are ranges that refer to a two-dimensional set of cells. These ranges N x M (Width x Height) and are most commonly utilized when binding grid-type inputs, such as Output and Input Grids, or defining ranges for One-to-Many Secondary Tables.
Give your application a name, then, upload your Excel file. Then click on Create Application button.

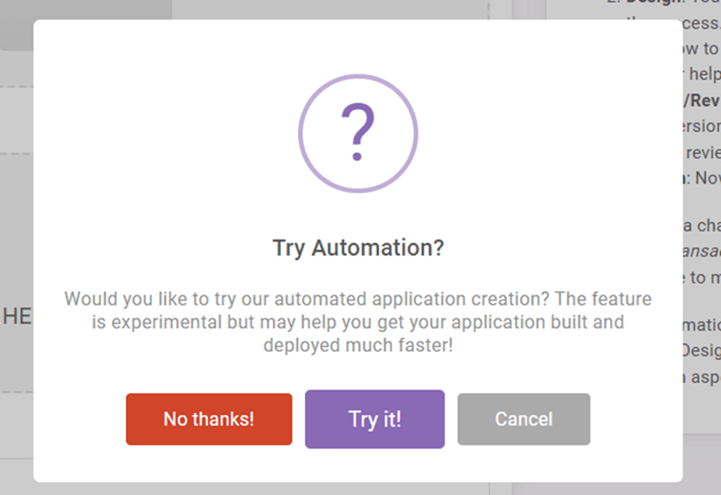
When you click on Create Application the system will suggest you to use the Automated Application Creation tool; If you want to use it choose Try it! option. If you want to create your application by yourself continue with No Thanks!
Once you upload your file, you can start building your application from the designer interface. You can go through the User Interface, Pages, Database, Style, and Events modules in any order you’d like. If you begin by creating the user interface first, building the database afterwards will be easier through the use of Add Used Columns.
Application Image
You can upload a custom image file that will be displayed on Card View. If no custom image is uploaded you will see either a placeholder or screenshot of the application based on the application’s rendered status.
