Data Import
Data Import is the process of importing a batch of records into SpreadsheetWeb Hub for populating the database of a web application. This can be done by importing from an external data file (CSV, XLSX or XLSM) into the database of an existing data collection application.
Import File
Import file can be a comma-separated text file (CSV) or a regular Excel 2007+ file (XLSX or XLSM). If your application has secondary data tables, prefer Excel file to populate multiple tables at once. You can update primary table only with a CSV file.
Import files should include proper data in a tabular form. The first row should have the titles of the fields to be able to bind fields between the file and the database.

Importing Process
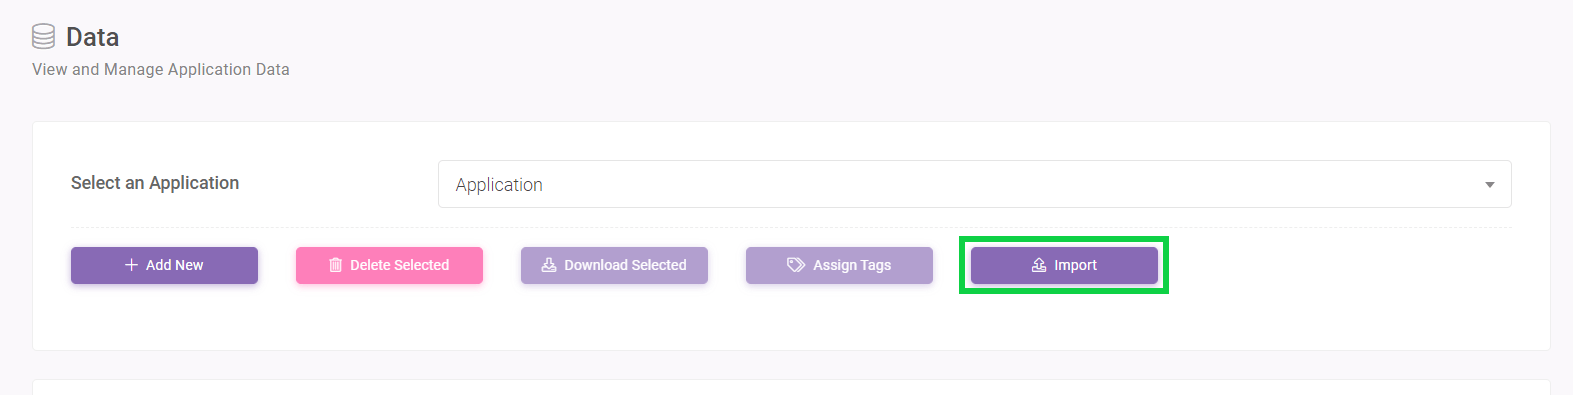
You can start the import process by clicking on Import button in Data Page.
Select your file by file-upload tool and click Upload File button to proceed into Data Import Preview.

The Data Import Preview page is where you can manage the the import process.
- This page allows you to determine if the import process will update and replace existing records, or append them. It also allows you to configure what behavior should occur with respect to Formula Based Overrides – whether the imported data should constitute an override of any formula-based cells.
- You can see the conflicts between the application database and the import data.
- The preview section displays data structure of the application database and the import data.
- You can make custom bindings between the application database and the import data.

Note: The import process does not include data from the Details and Files worksheets. These worksheets contain system-managed information that SpreadsheetWeb generates and maintains automatically, such as Record ID, User ID, and Created Date. The Files worksheet also contains attachment-related fields such as File Name, File ID, File Size, and Content Type. Any information listed in these worksheets will be ignored during import and will not be brought into the application.
The Import button becomes visible when all conflicts are resolved. Click to complete the import process.

You will see the following message upon successful data import.

Clicking OK button will load the Data Page that will list imported records.
Import Options
Import Options allow you to define if the import process will create new data, add the imported data into the existing set, or update the existing set.

Updating Existing Data
Leave either checkbox empty. This option will update existing records on the database by corresponding values in the imported data. The matching between new and existing data is made by comparing identifier fields Id, EditId and SequenceId (only for secondary tables).
Make sure that these columns are bound correctly.

If the imported file has different identifiers, you will see the following warning message:

New Data
Check Remove all data before the import option to wipe out existing records in the database and import what you have in the file.
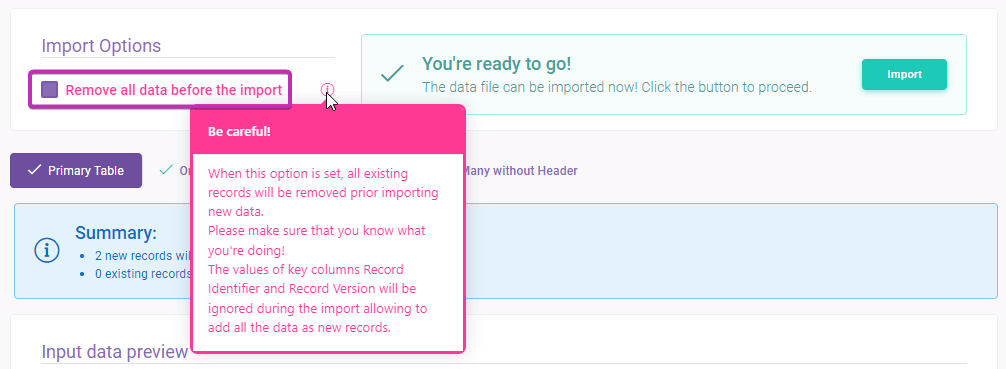
When this option is selected the identifier columns (Id, Edit and SequenceId) will be ignored during importing. The values for these fields will be generated automatically.
Tip: The Id is generated by the order of the records in the import file. If the order matters, arrange the records in the file before importing.
Appending Data
Check Append all data as new records option to append the records in the file as new records while keeping existing records.

When this option is selected the identifier columns (Id, Edit and SequenceId) will be ignored during importing. The values for these fields will be generated automatically.
Tip: The Id is generated by the order of the records in the import file. If the order matters, arrange the records in the file before importing.
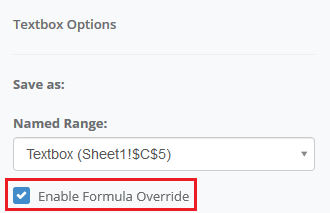
Overwriting formulas
Enabling the Overwrite formula-based inputs option allows the formula-based result in the control to be overwritten. In the application, this means that users can set a value on top of (hence, overwriting) a cell value that normally has a formula in it. The associated formula will not impact the cell value once edited.
By enabling this option, you are indicating that you want the overwriting behavior apply to any imported and bound columns, as it pertains to the controls. For example, if you have a textbox with overrides enabled, and you are importing to a column that is bound to that textbox, then the value when you load the record will be the imported value (i.e., overridden value) rather than the calculated value.
![]()
This option is enabled only if the application has an input with the Enable Formula Override option enabled. You can find more information about Enable Formula Override in the corresponding input’s help page (e.g., Textbox).
Database Column Binding
SpreadsheetWeb Hub matches fields by matching names automatically. You can change them manually by selecting suitable field name on the Bind Input Column section.
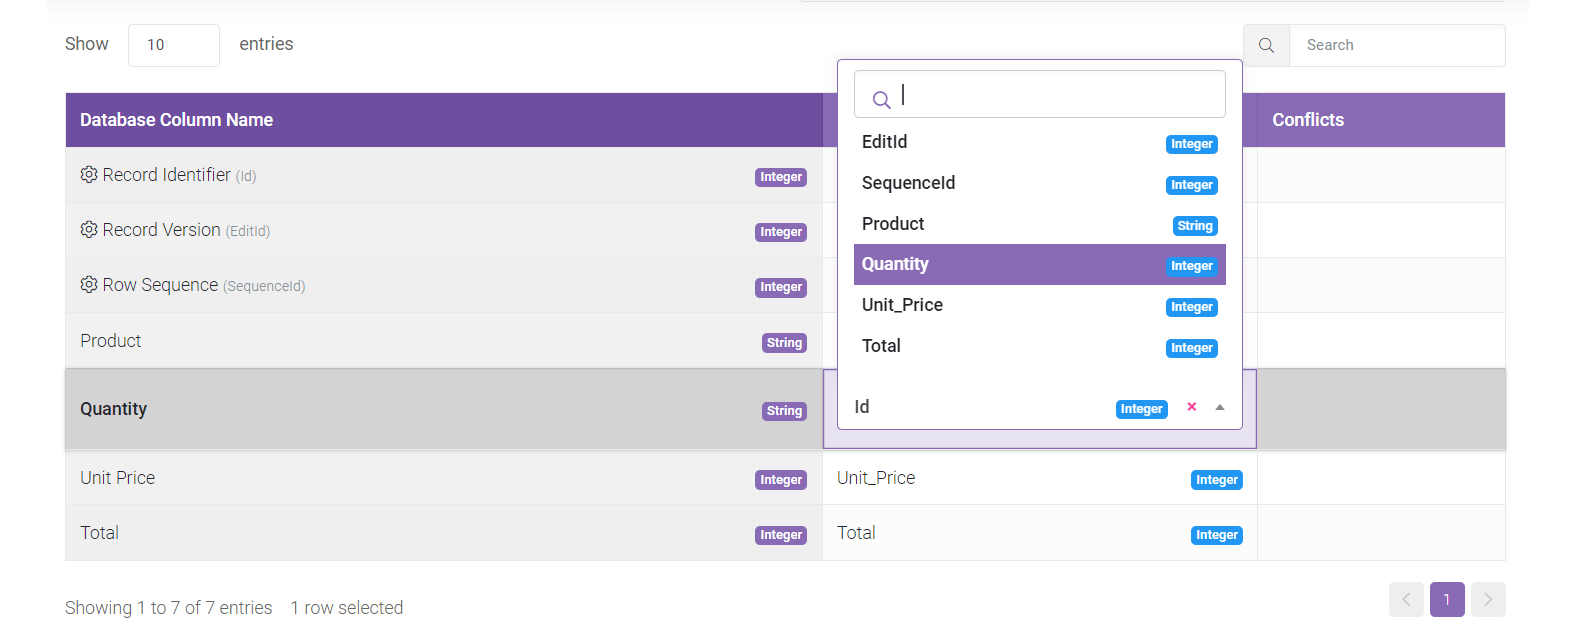
If your application has a multi-table database, make sure that Input data preview and Database Column Binding tables are pointing to the corresponding tables.

Tip: If the field you are looking for is not among the dropdown options, confirm that the type of the field in the file is compatible with the database counterpart. For example, you can’t assign a field with decimal values into a database field accepting integers.
You can check the detected fields in your file on the Input data preview table above.
