Identity Templates
Create SpreadsheetWeb Identity Templates with guided access, clear permission scopes, tag rules, and user-specific record authorization.
SpreadsheetWeb Identity Templates are reusable access policies for workspace users. A template can define which workspace features, dashboards, applications, and records a group of users can access, as well as the actions they can perform.
Use Identity Templates for roles that need the same permissions, such as sales representatives, application reviewers, data managers, or workspace administrators. You can assign a template when inviting a user or apply one later from the user’s access page.
Open and manage Identity Templates
- Open Users in SpreadsheetWeb Hub.
- Select Identity Templates.
- Select Add New User Template to create a template.
The User Templates page lists each template, its assigned user count, creation date, last update date, and available actions. Use Edit, Clone, or Delete to manage an existing template.
Create an Identity Template
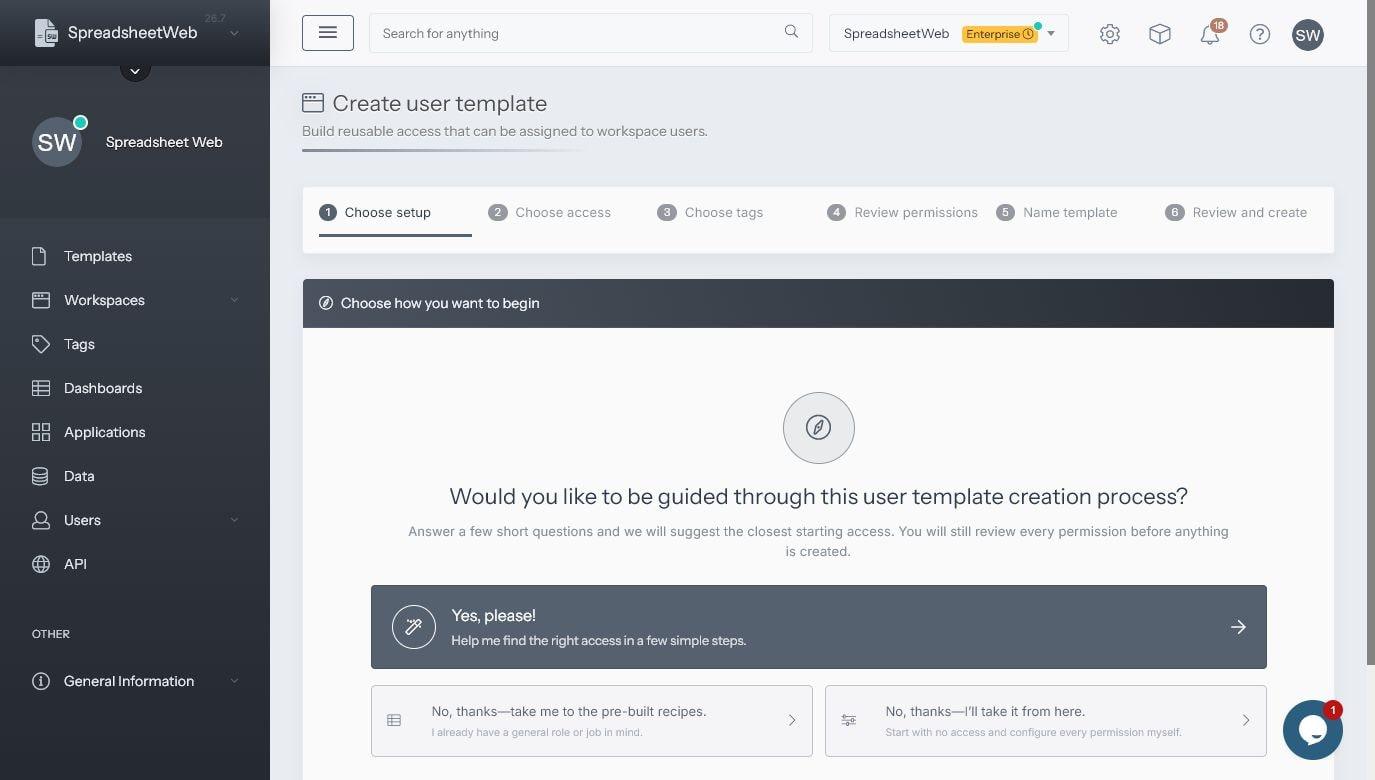
The creation workflow uses six stages: Choose setup, Choose access, Choose tags, Review permissions, Name template, and Review and create.
1. Choose a starting point
Select the setup method that fits your role:
- Guided setup asks short questions and recommends suitable starting access.
- Pre-built recipes let you begin from a general role or job pattern.
- Custom setup starts with no access so you can configure every permission.
A recommendation or recipe is only a starting point. You review and can change every permission before the template is created.
2. Choose recommended access
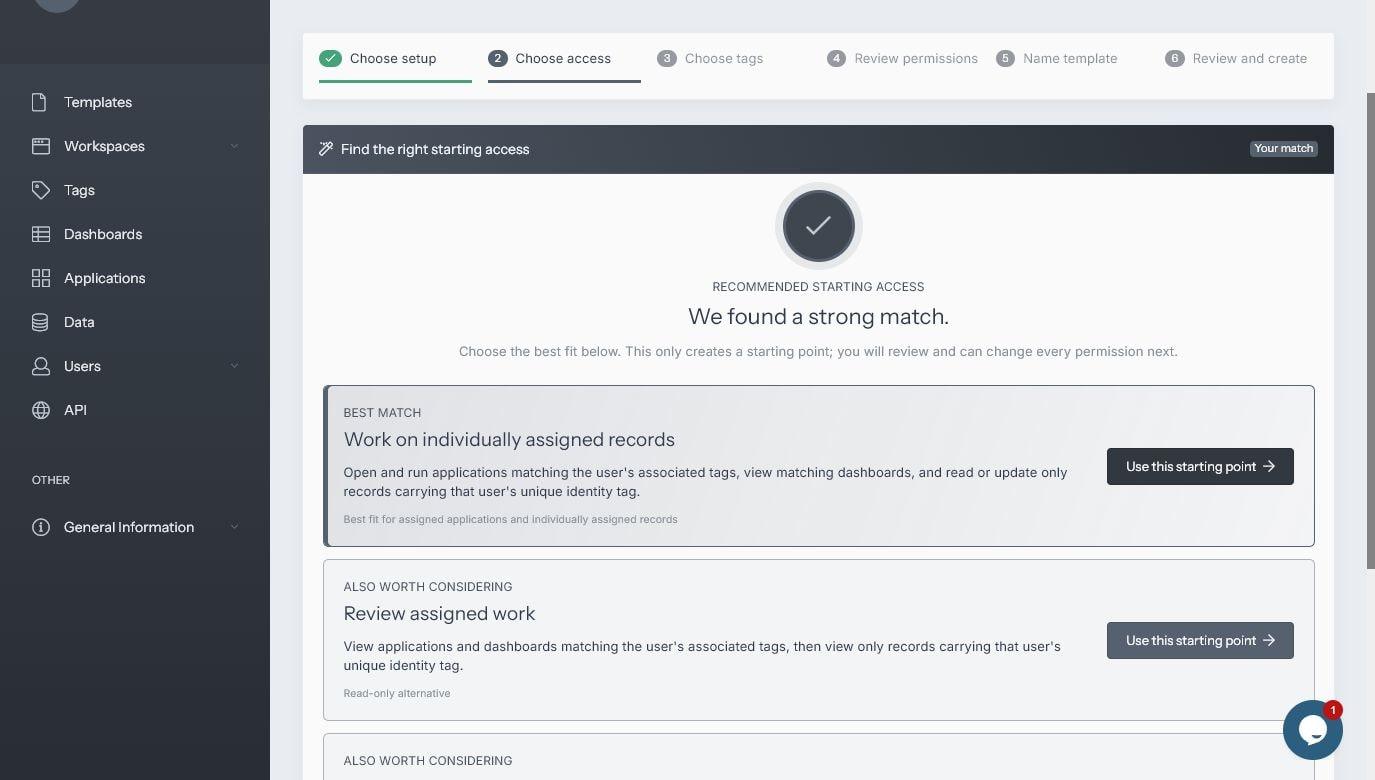
Guided setup separates team access from individual work, then asks what users need to do. SpreadsheetWeb recommends the closest access pattern and shows alternatives. For example, Work on individually assigned records allows users to run matching applications and work only with records assigned through their unique identity tag.
3. Choose access tags
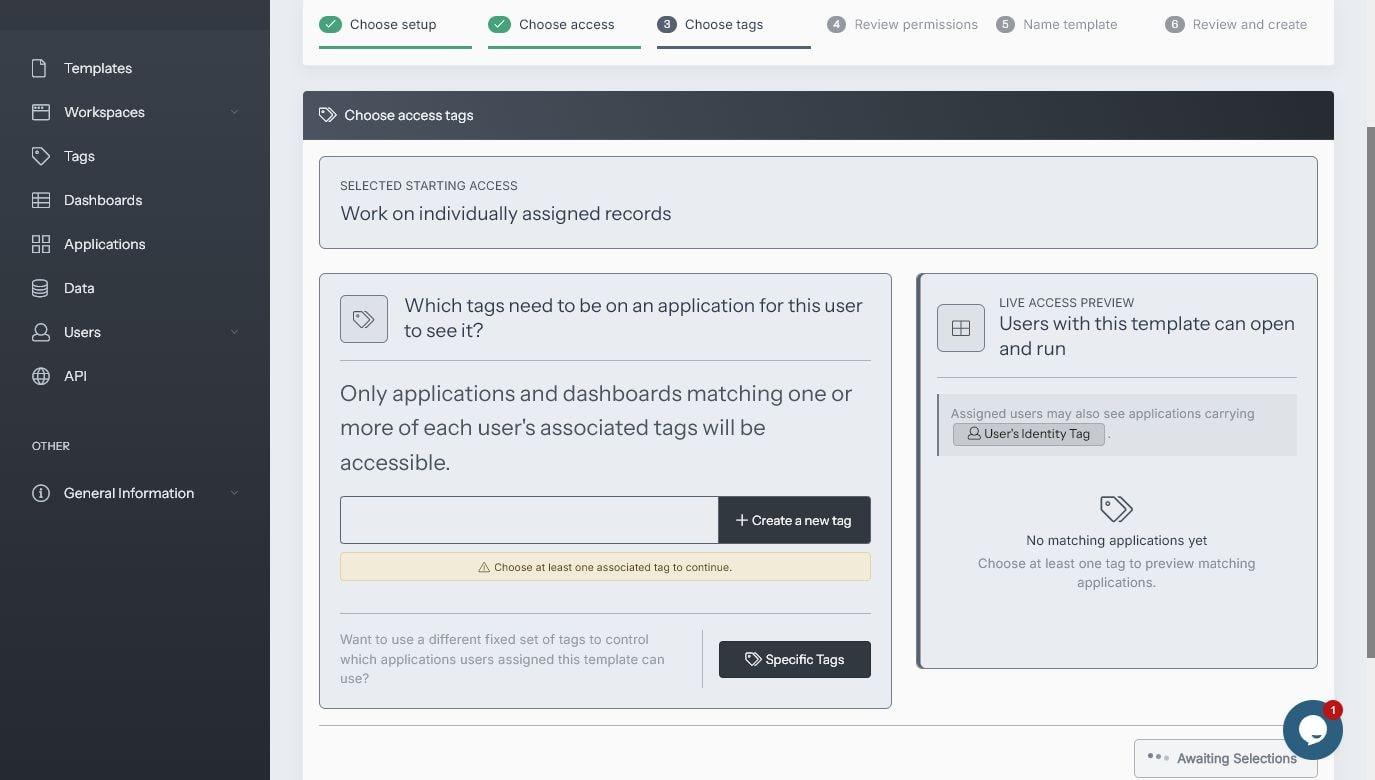
Select the tags that identify the applications and dashboards intended for users assigned this template. The live access preview shows which items match the current selection. You can also switch to Specific Tags when a permission should use a fixed tag set instead of each user’s associated tags.
Understand associated tags and identity tags
Associated tags are the tags assigned through the template or directly to a user. Tags do not grant access by themselves. A permission must reference those tags before they affect access.
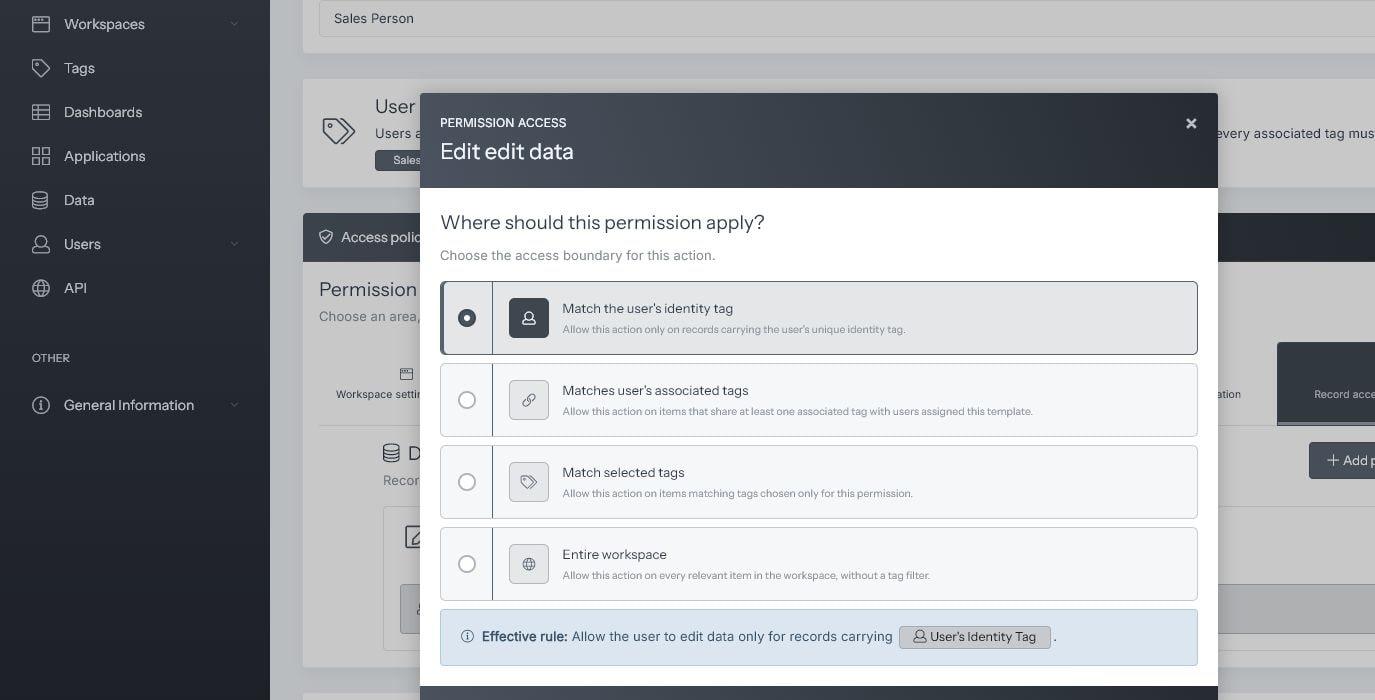
Each workspace user also receives a unique User’s Identity Tag. This first-class authorization option can restrict record access to records assigned to that individual user. For example, an Edit Data permission scoped to the user’s identity tag allows a user to edit only records carrying that user’s unique tag.
Application and dashboard permissions can match one or more associated tags, require every associated tag to match, use a separate set of selected tags, or apply to the entire workspace. The interface displays the effective rule in plain language before you apply it.
Review permission areas
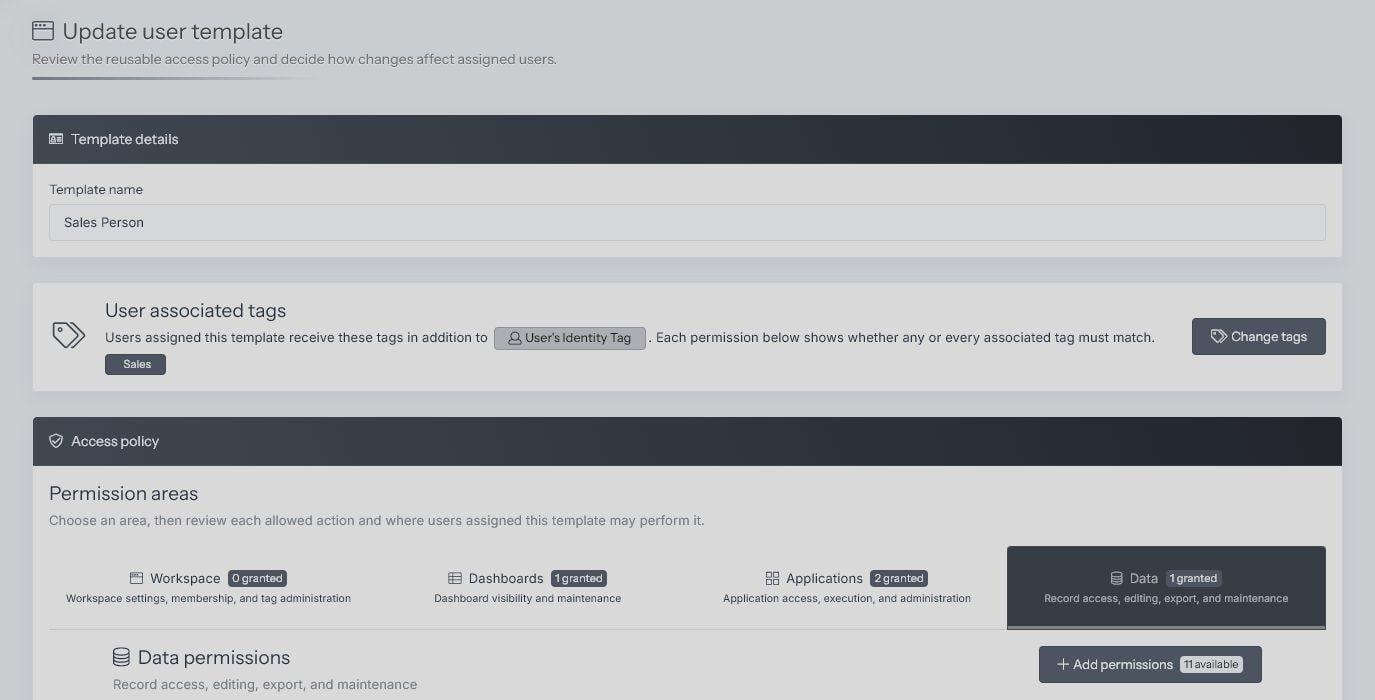
Permissions are organized into four areas so the application and record boundaries remain clear:
- Workspace: workspace settings, membership, tag administration, API clients, analytics, and related administration.
- Dashboards: dashboard visibility and maintenance.
- Applications: application access, execution, and administration.
- Data: record access, editing, copying, export, sharing, comments, and maintenance.
Each area shows the number of granted permissions. Select an area to review its actions, add permissions that are not yet granted, or edit the access rule for an existing permission.
Choose a permission scope
When you add or edit a permission, choose where that action applies. Available boundaries depend on the permission and can include:
- Match the user’s identity tag: allow the action only on records carrying the user’s unique identity tag.
- Matches user’s associated tags: allow the action on items sharing at least one associated tag. Some application permissions can require every associated tag to match.
- Match selected tags: use tags chosen only for that permission.
- Entire workspace: allow the action on every relevant item without a tag filter.
Read the Effective rule before selecting Apply access rule. It summarizes the resulting access in plain language.
Name, review, and create the template
Enter a concise template name that describes the role. In the final review, confirm the associated tags, permission areas, granted actions, and access boundaries. Select Create user template only after the summary matches the intended access policy.
Assign and update user access
You can assign an Identity Template while inviting a user or from that user’s access page. The user access page shows the selected template, associated tags, and effective permissions.
Applying a template replaces the user’s current access with the template policy. If you edit an individual permission after applying the template, the user’s access becomes custom and is disconnected from that template. This prevents later template changes from silently replacing the custom policy.
When editing a template, review its assigned user count, associated tags, granted permissions, and access scopes before saving. Users who remain linked to the template continue to use its reusable policy.
Clone or delete an Identity Template
Select Clone on the User Templates page to create a new template from an existing policy. Review the copied tags and permissions, enter a new name, and complete the final review before creating it.
Select Delete to remove a template. Review the confirmation and the template’s assigned user count before completing the deletion.