Validation Messages
The active spreadsheet has no named ranges!
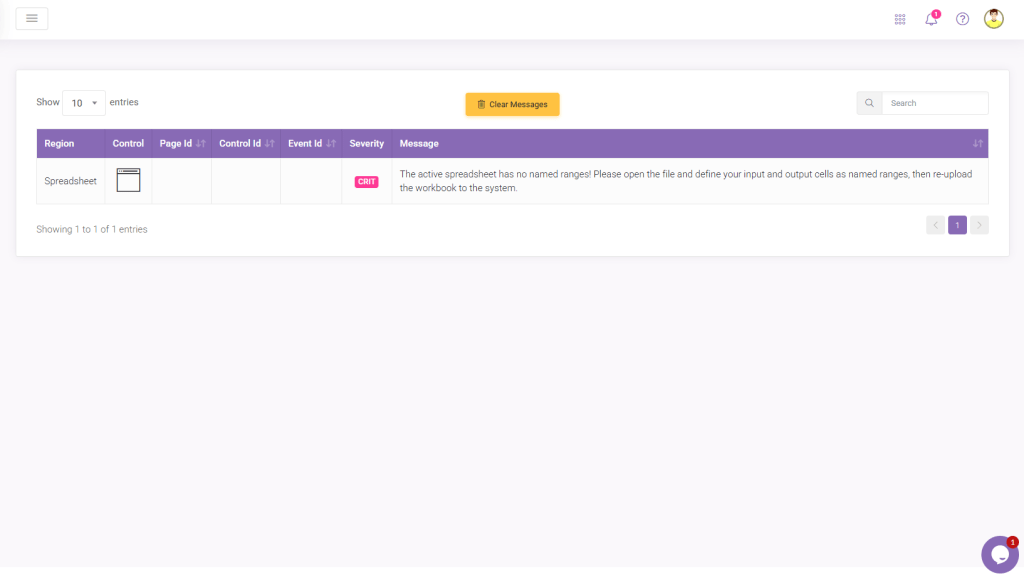
The message appears if the Excel file lacks named ranges. For a spreadsheet to be transformed into a web application, it’s essential for the system to identify the cells linked to user interface controls. Establishing named ranges within Excel facilitates this process. Through named ranges, each user interface control can be associated with a specific range in the Excel file.
Resolution steps:
Open your Excel workbook and individually assign named ranges to each input and output cell (for single cells, use a single named range) or to a cell range (for tables, use a table named range).
Alternatively, highlight a cell range that encompasses both the input/output cells and their labels, then navigate to the Formulas tab and select the “Create from Selection” button. This action will automatically assign names to the input/output cells using their titles as references.

Another option is to start a new application and select “Try It” when prompted with the “Try Automation” question. This will automatically incorporate all named ranges into the input and output cells. Afterward, you can download the updated Excel file, which will include named ranges created by our AI based on the application you’ve set up.


The Control on page X is bound to a named range Y that no longer exists.
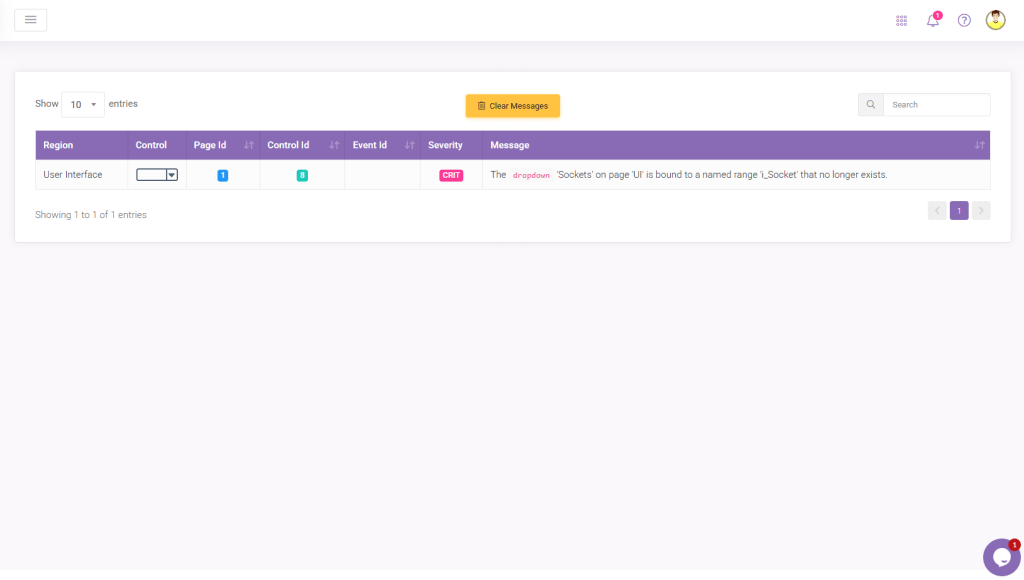
This message indicates that a named range, which was linked to a control in the user interface, has been deleted from the Excel file (or it’s name was changed in Excel file).
Resolution steps:
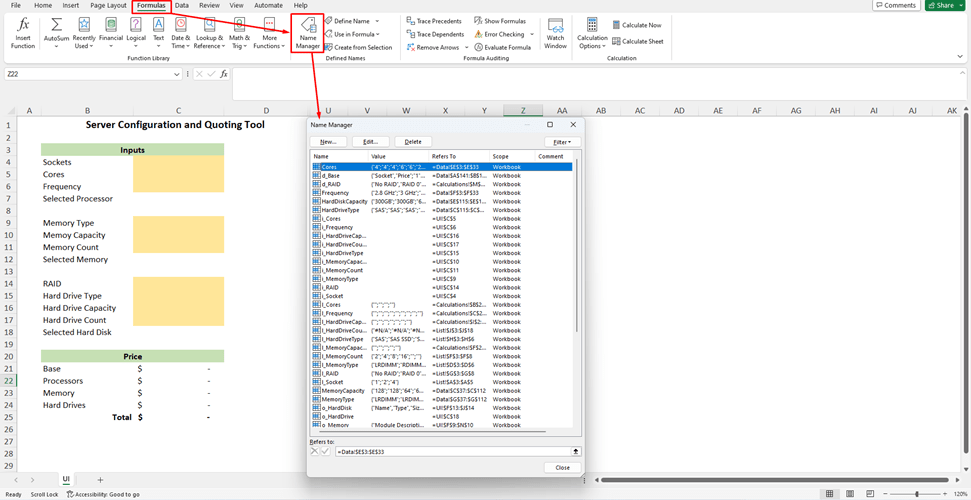
Download the most recent Excel workbook for your application by visiting the My Applications page. It’s recommended to navigate to the History tab of your web application and use the Download Excel button found there (the latest version is listed at the top).

Open the workbook and proceed to the Formulas tab. Access the Name Manager, locate the named range whose name you altered, and click the Edit button to revert it to its original name. Save the changes and re-upload the Excel workbook to your application. If the named range is missing (e.g., it was accidentally deleted), you’ll need to recreate it in your Excel workbook. Save this update and re-upload the file to your application to rectify the validation error.

If changing the name of the named range has led to a validation error, an alternative to adjusting the name in Excel is to go to the User Interface, delete the control you created, and then recreate it using the newly named range. However, if this named range has also been added to the database, it will require updating there too. Generally, if the control was already incorporated into the database, it’s more efficient to manage the name change or recreate the named range directly in the Excel workbook.
The Enabled (or Visible) property of Control on page X is bound to a named range Y that is no longer a Boolean.

This message is shown when a named range, originally set as a Boolean (TRUE/FALSE) and linked to the Enabled (or Visible) property of a control, ceases to be Boolean. The Enabled property requires a TRUE or FALSE value; altering the Boolean characteristic of the named range breaks this functionality.
Resolution steps:
Download the highlighted Excel workbook, locate the named range assigned to the boolean cell, and either reinstate the static TRUE/FALSE value or reintroduce the formula that generates TRUE/FALSE. Subsequently, save the changes and upload the Excel file back to your application. This should resolve the validation error.

Too many validation messages after updating the Excel file.

This problem occurs when an updated Excel file is uploaded, which includes several modifications, particularly related named ranges tied to user interface controls. Messages labeled with blue “INFO” tags can be disregarded, but those marked with red “CRIT” tags require immediate attention.
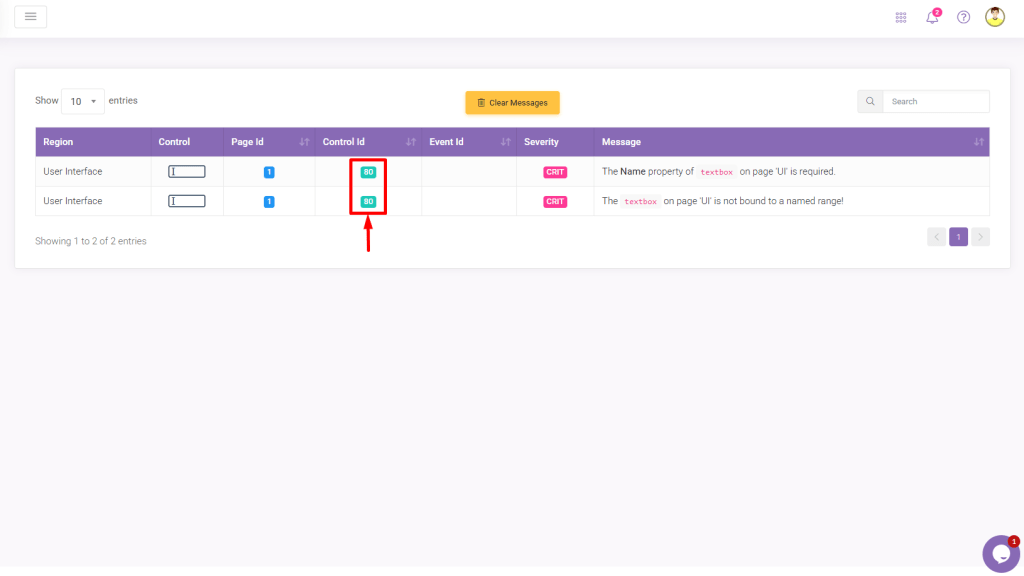
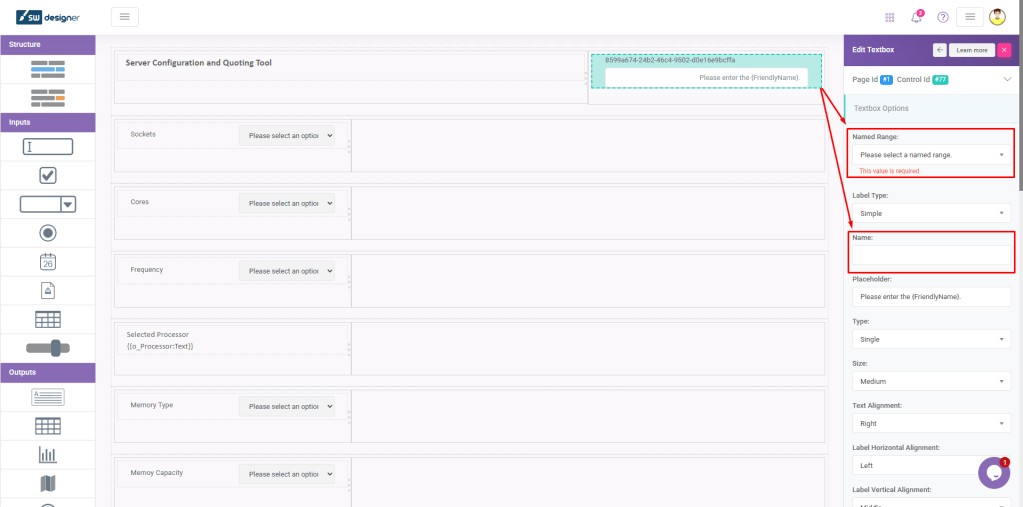
The Name property of Control on page X is required. The Control on page X is not bound to a named range!

Typically, this occurs when you drag and drop a control into the User Interface module but neglect to link it to a named range and fail to assign a name to it in the Name property.
Resolution steps:
To fix this issue, simply navigate to the User Interface, choose the control you’ve created, and link it to a Named Range using the dropdown list. The control’s Name will default to the named range’s name, but you can change it if needed. It’s essential that every control (apart from Content Control) is bound to a named range and has a text value assigned in the Name property.
There are no databases set up for the application for button Name on page X to use for saving!
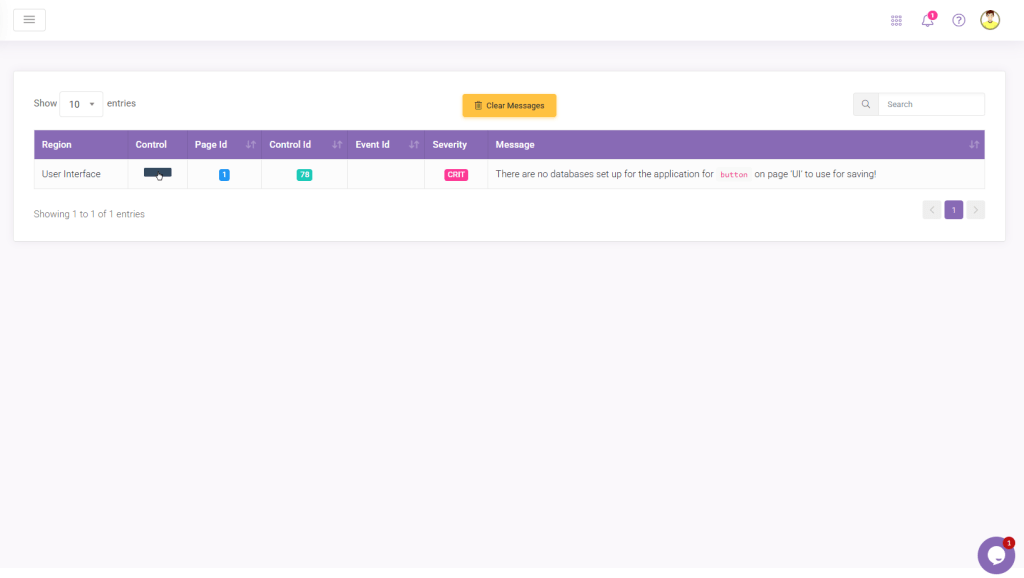
This typically occurs when a user has set up an action button and linked a “Save” event to it but has not yet added a database.
Resolution steps:
To address this issue, you have two options: either navigate to the Databases module and create a Primary data table, or go to the User Interface and detach the Save event from your action button.

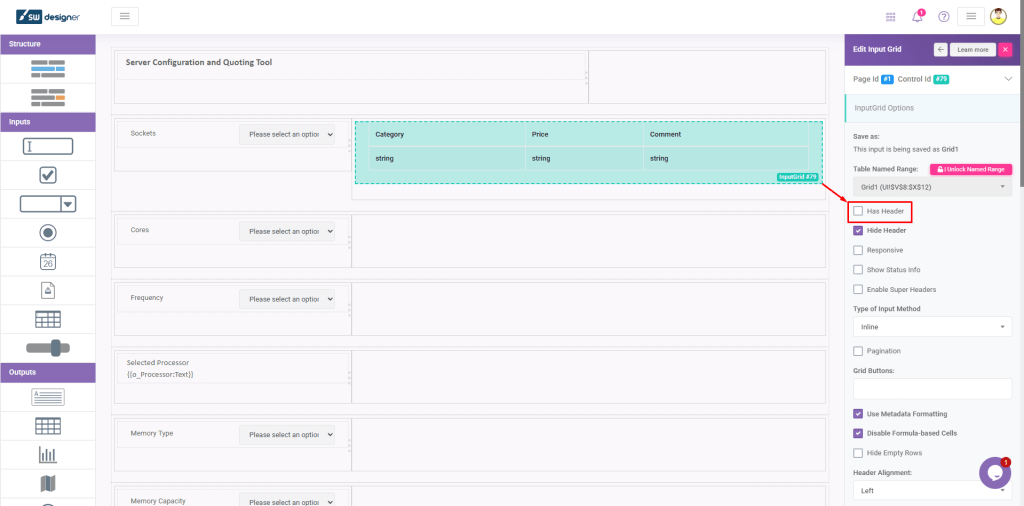
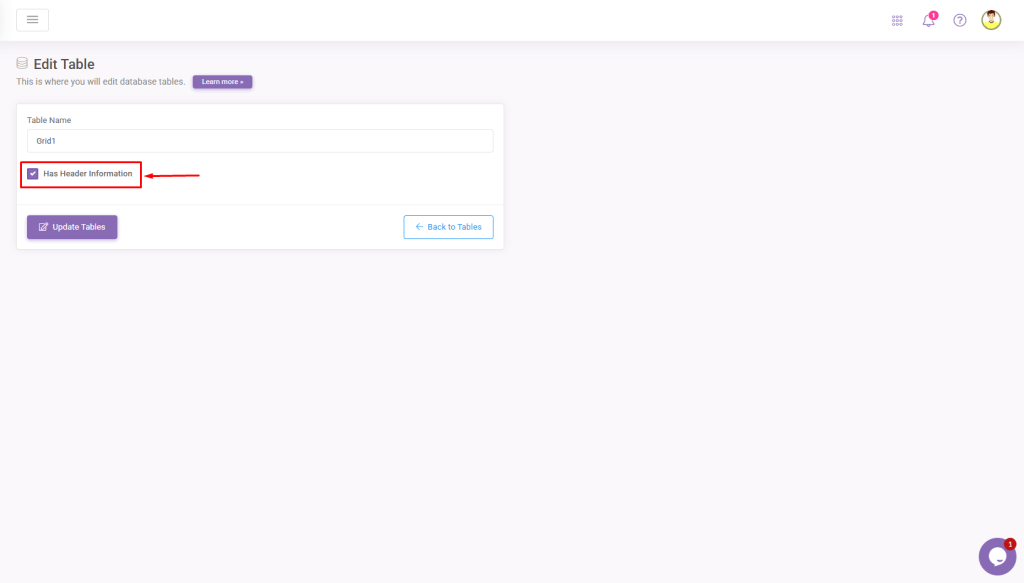
The Input (or Output) Grid on page X and One to Many Secondary table Y are bound to the same table named range (Z) but, they have conflicting Header Information. Please update the control or the database table so that they have matching information.
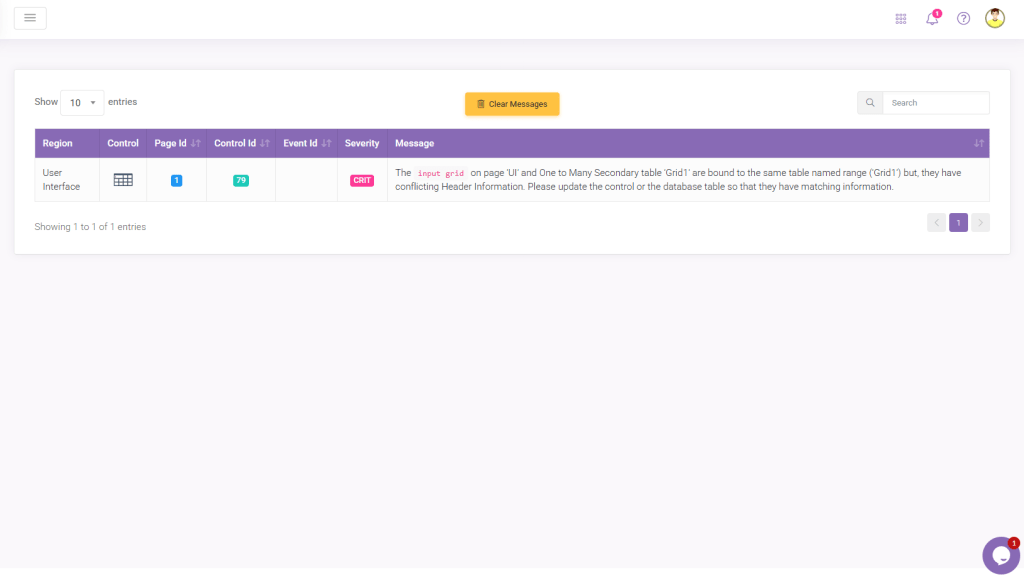
This validation error typically occurs when a user sets up an input or output grid in the User Interface with the “Has Header” option marked as either TRUE or FALSE. Concurrently, the named range for this table is included in a Secondary 1-to-many data table where the “Has Header” setting is the opposite value (TRUE if FALSE in the User Interface, and vice versa).
Resolution steps:
The “Has Header” setting needs to be consistent between the table in the User Interface and its counterpart in the database. You should adjust this setting by either going to the User Interface and setting “Has Header” to TRUE or FALSE, or by navigating to your Secondary 1-to-many table, clicking the “Edit Table Info” button, and then checking or unchecking the “Has Header Information” checkbox to match.

The input (or output) grid on page X is bound to a table named range that has had its column width modified (Y). Please navigate to the User Interface designer and use the Consolidate Columns feature on the input grid.

This message typically appears alongside the notice “The underlying named range for Z has changed. Please run consolidation.” This duo of messages often emerges after a user has established an input or output grid in the User Interface and subsequently added it to the database. However, if the user later modifies the table’s named range in the underlying Excel workbook—by adding new columns or removing existing ones—and then saves and re-uploads the updated Excel file back to the application, the system will prompt for consolidation in both the User Interface and Database.
Resolution steps:
Start by navigating to the User Interface, then select your created grid control and click on the yellow “Consolidate Columns” button to resolve it there.

In the Grid Column Bindings modal window, you’ll be required to specify the newly added and previously existing columns accordingly. Alternatively, you can choose to delete this grid control and recreate it from scratch, utilizing the updated table named range.

To address the second issue related to the database, proceed to edit columns of your created Secondary 1-to-many table.

Click the “Consolidate” button

In the Consolidate Table Named Range screen, you should click on the empty cells in the last column and choose the “Add New” option for the newly added columns in the named range, then click the “Update Mappings” button to finalize the consolidation process. Once the grid in the UI and the database align with the total new column count in this named range in Excel, you will be enabled to proceed to Preview/Publish your application.

Column X on table Y is bound to a print process (or excel export process) that no longer exists!
The issue arises after you’ve added a Print or Excel Export process and incorporated it into your database as a File Type. Subsequently, if you delete the print/excel process from the Events module but fail to remove it from the Database and attempt to republish your application, this problem will occur.
Resolution steps:
Navigate to the database and delete the File Type column that was created and linked to the print/excel process you have removed.

Go to the database and delete the File Type column that was set up for the print/excel export process.

Validation Messages
Error messages in the Designer are interactive. Clicking an error message will take you directly to the problematic control, helping you identify and fix issues faster.
Work in the Designer interface as usual. If an error appears, click on the error message. The system will automatically navigate you to the control causing the issue so you can make corrections instantly.