Adding Quoting Calculations to HubSpot
Creating a quote for a customer can be complex. There are many product combinations, price options, discounts, etc. Many businesses use Excel to build quoting applications. But they are never connected to their CRM systems where they manage their entire sales process.
In this use case, we will show you how to connect a quoting application built on SpreadsheetWeb platform from a pricing spreadsheet into HubSpot CRM.
This is a two step example where the quote data is added as a lead in HubSpot. It is then sent to a SpreadsheetWeb application that calculates the quote and returns the results back to the same lead. The end user doesn’t even need to leave HubSpot for the entire process to happen.
First, add custom properties to your deals in HubSpot if needed. Most quoting applications have custom data fields. Also, make sure to create at least one deal to test HubSpot trigger in Zapier side.
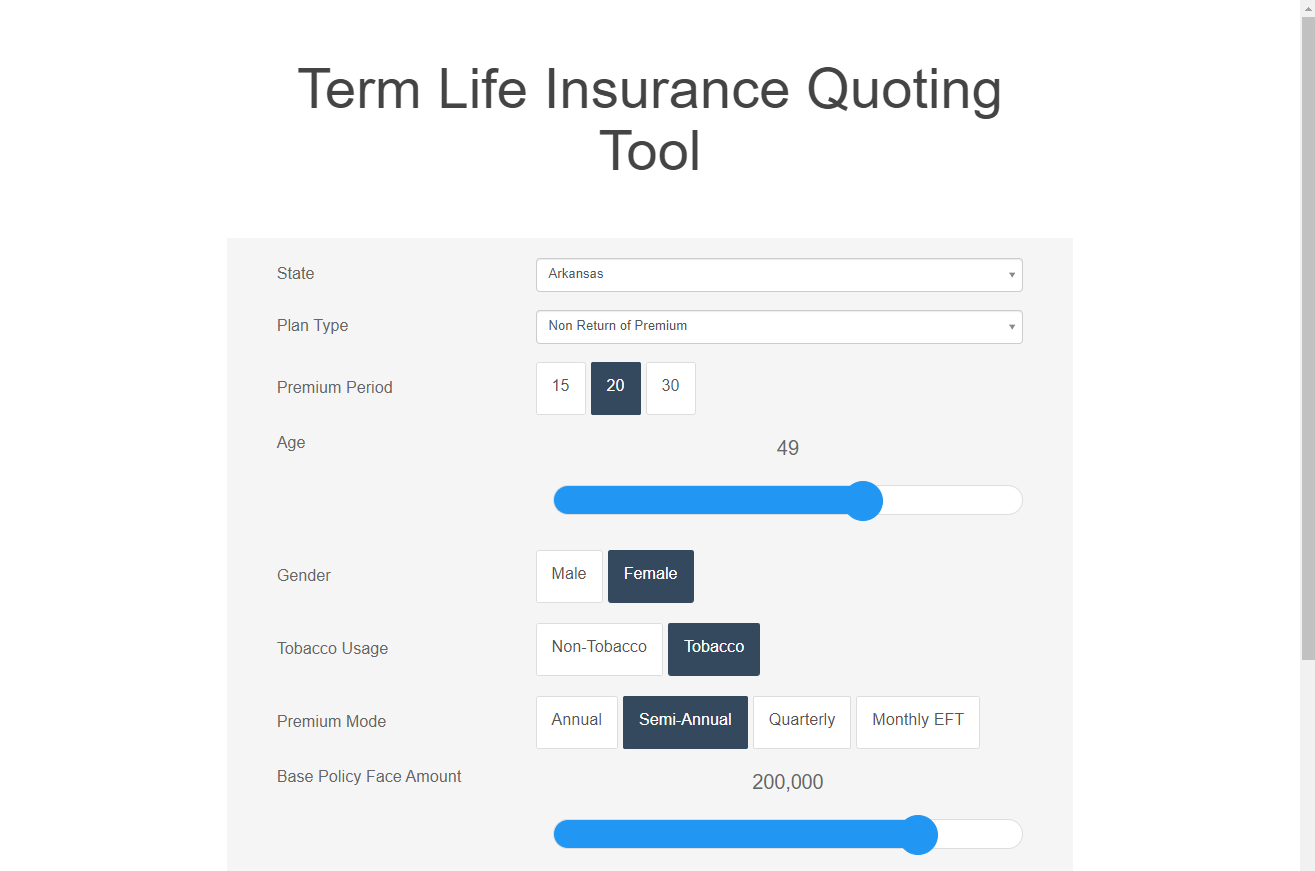
Next step is to create a quoting application in SpreadsheetWeb Hub from your Excel workbook that contains necessary calculations for the deal. Below is a screenshot from an insurance quoting application for a life insurance company.
When your application is ready, go to your Zapier and create a Zap.
While adding a trigger, choose the application as HubSpot and the event as New Deal.

Then, connect with your HubSpot account.

The next step is to set up the trigger. Select the properties you want to send to the SpreadsheetWeb Hub application to be calculated.

Now, you can start to test the trigger event to make sure the connection is valid. You will see the values of a saved deal under your HubSpot app.
Tip: Save at least a record before testing. Zapier seeks an existing record to validate its connection test.

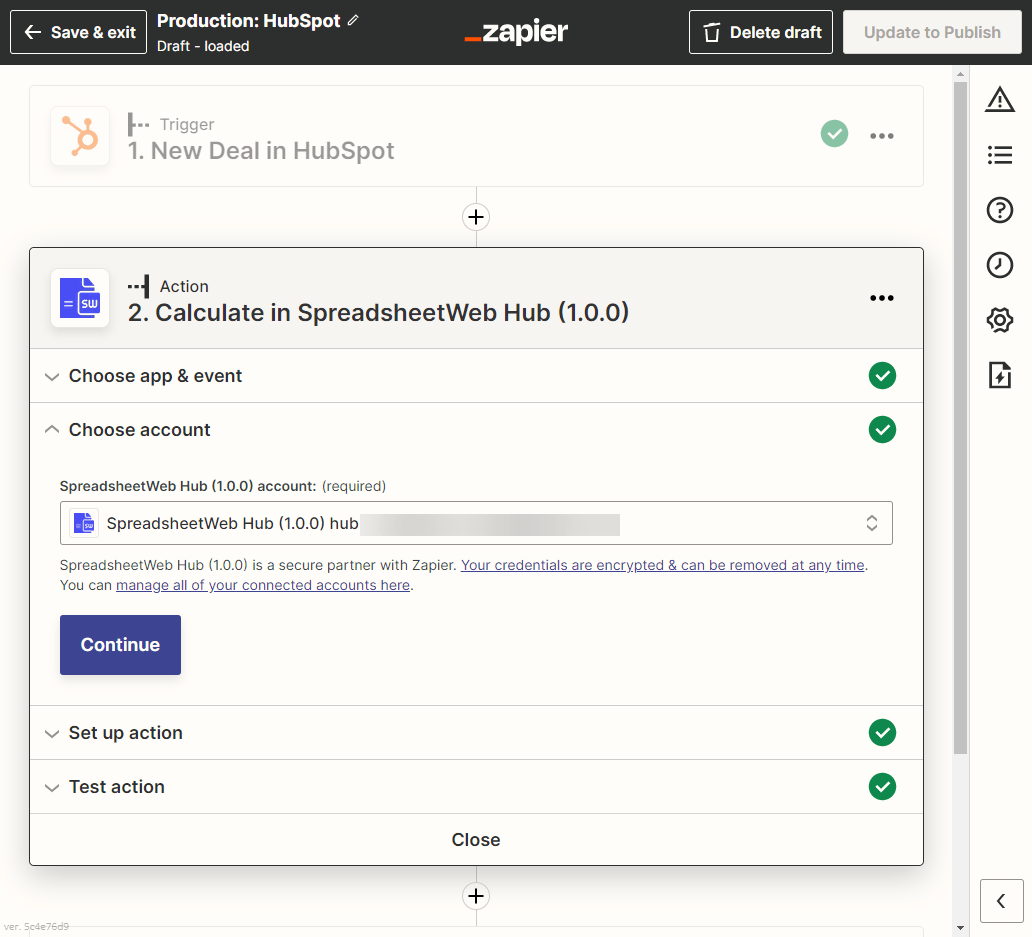
After testing the trigger event, add an action for the SpreadsheetWeb Hub calculation. Choose the application as SpreadsheetWeb Hub and the event as Calculate.

Then, connect with your SpreadsheetWeb Hub account.
Next step is to set up an action. Select the workspace and application on your SpreadsheetWeb Hub account to load the fields (named ranges) in your application. Match the field names with the property names of HubSpot deals.
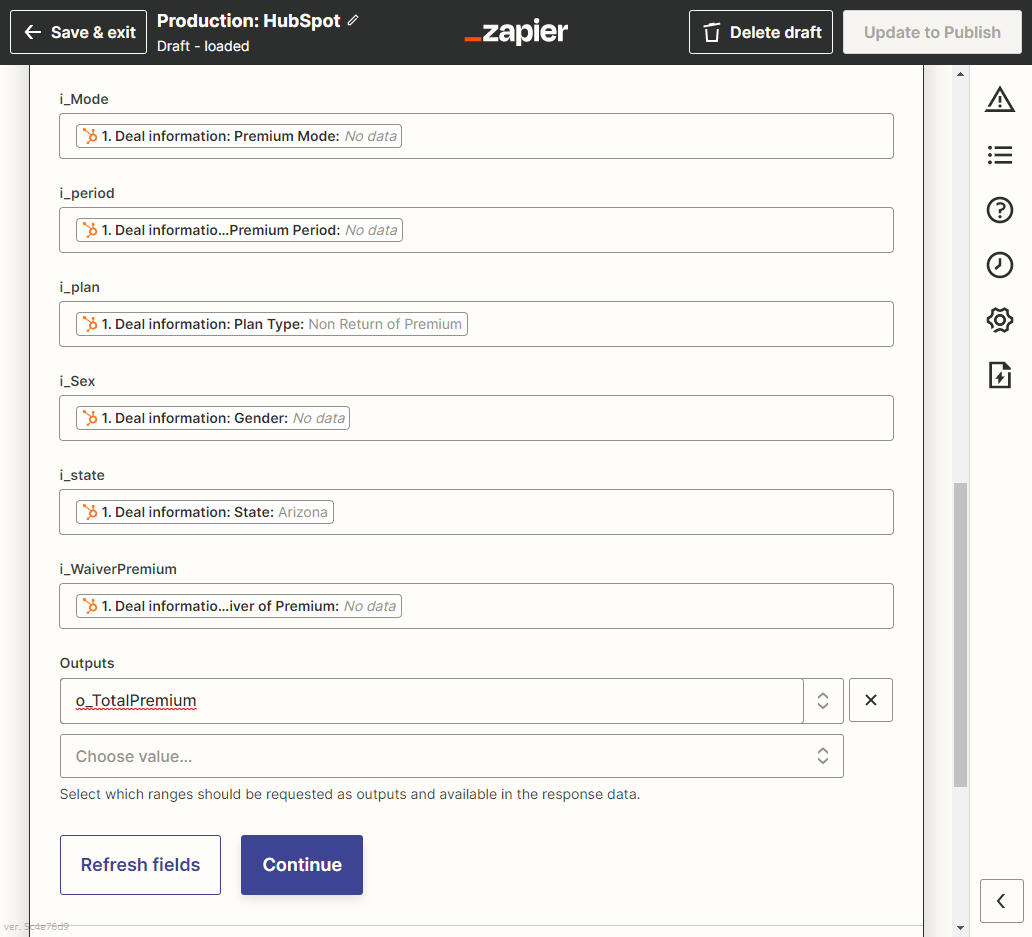
Leave the fields empty that you want to be calculated. Instead select them in the Outputs field.
Then test the action event to make sure the connection is valid. You will see the results that returning from selected output fields.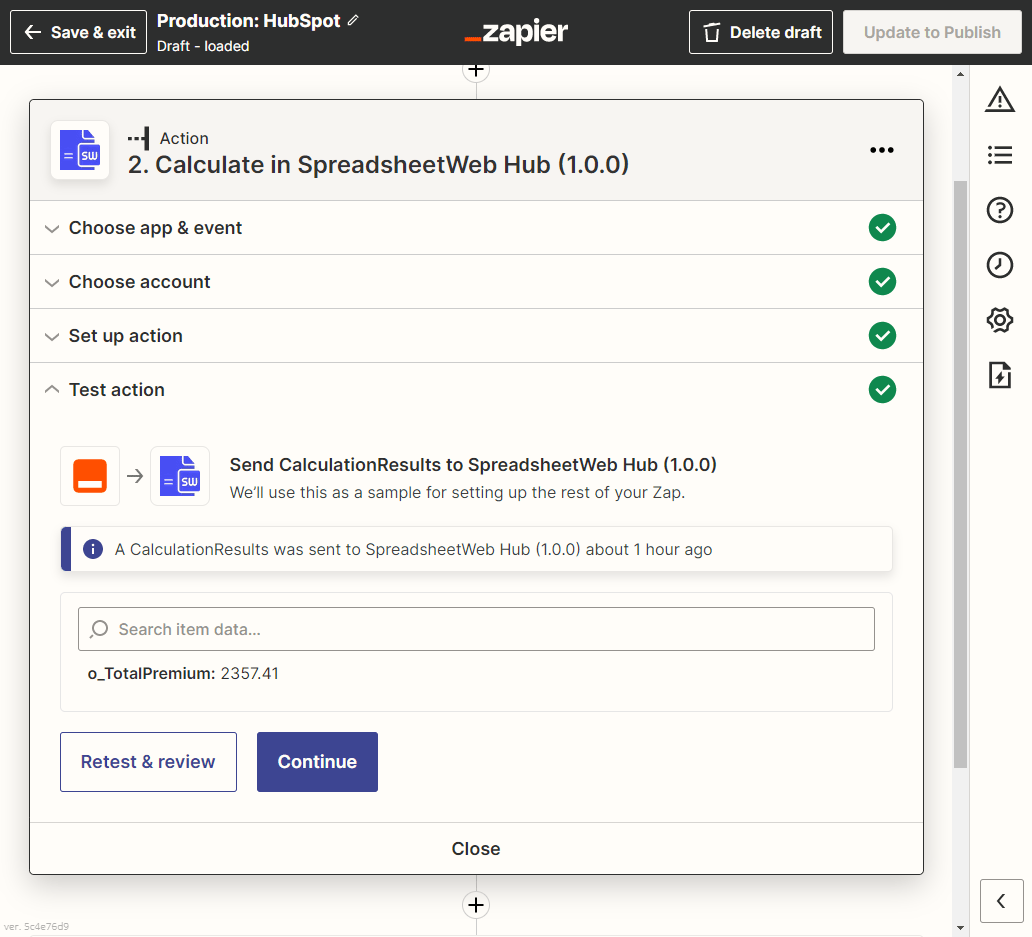
Now, add a second action for Hubspot to update deals. Choose the application as HubSpot and the event as Update Deal. Then connect with your HubSpot account.
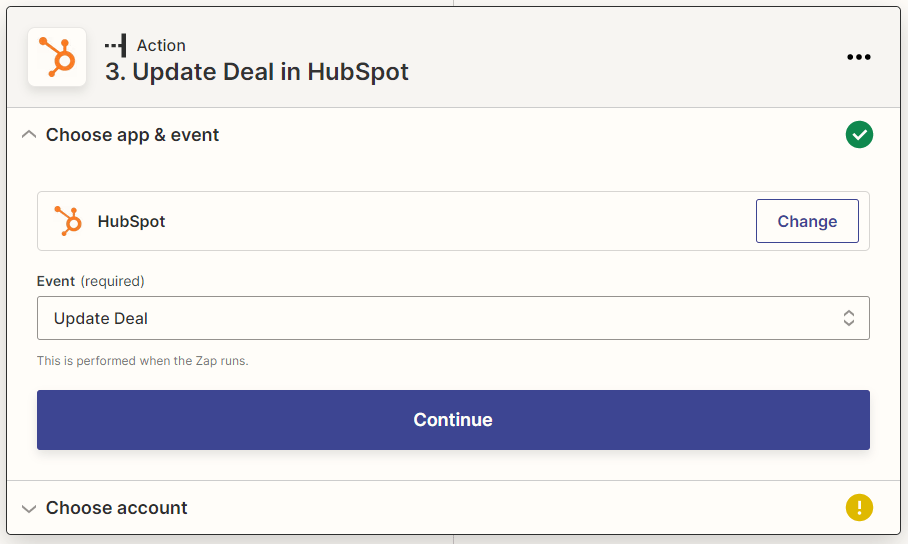
Next step is to set up the action. This time make sure to match the Object ID with the ID field from the trigger.

Also, do not forget to assign the calculated values to corresponding fields. In our example “Total Premium” is the calculated value we want to bring from SpreadsheetWeb and save it into our lead.

Do not make any assignments unless you want other fields to be updated.
Now, it is time to test the action. If testing is successful, you will see a list of properties that belongs to tested deal.

Your Zap is now ready to publish. You can also see the updated value on your HubSpot account.

After publishing the Zap, login to your HubSpot account, open Sales > Deals page and click on Create Deal button. Fill information and click Create.

On the new page, click View all properties button. Fill the corresponding properties to be sent to the SpreadsheetWeb Hub Application. When you are done click on Save. When you refresh the page you will see the Premium field is populated with the correct value. Note that, this might take a few minutes depending on your Zapier account type.
And this is how to utilize Zapier to automate the process of creating a deal on HubSpot, pushing deal information to SpreadsheetWeb Hub Application to be calculated and then updating the results to the same deal on HubSpot.
Integrating Print, Excel, and Email Events with Zapier and SpreadsheetWeb
In addition to performing calculations, the integration supports triggering specific actions like printing, emailing, or exporting results to Excel:
- Print: The function can instruct SpreadsheetWeb to generate printable versions of the results, which are then returned as URLs to downloadable PDF files.
- Excel Export: For further analysis, results can be exported to Excel. This is particularly useful for data that needs to be reviewed or manipulated further in a spreadsheet format.
- Email: When the email event is triggered during the calculate event, if an email is associated with the selected application, an email notification is sent to the user, providing direct communication about the processed data.
Downloadable URLs and Uploading to Cloud Storage
Once the files are generated and available through downloadable URLs, these can be used within the same Zap to upload the files to cloud storage platforms like Google Drive or OneDrive:
- Google Drive: Automate the storage of exported Excel files by uploading them directly to specified folders within Google Drive, allowing for easy access and sharing across teams.
- OneDrive: Similarly, files can be uploaded to OneDrive, ensuring that users within a corporate environment can access reports and data outputs from anywhere, aligning with organizational data management policies.
Practical Implementation
To implement these features, you would set up a Zap that listens for a particular trigger (e.g., the end of a day or receipt of new data). The Zap then calls the events, which sends the appropriate data to SpreadsheetWeb, triggers the necessary events (print, export), and handles the responses, including managing downloadable URLs and uploading files to cloud storage.
Setting Up
Step 1: Logging into Zapier and Creating a New Zap
To start automating your processes with SpreadsheetWeb, the first step is to log into your Zapier account. Once logged in:
- Navigate to the dashboard.
- Click on “Make a Zap” to create a new automation.
Step 2: Configuring the Trigger
The trigger is what starts your Zap. For integrations with SpreadsheetWeb, you’ll need to set this up to respond to events from your SpreadsheetWeb application:
- Choose “SpreadsheetWeb Hub” as the app from the Zapier app directory.
- For the trigger event, select “New Data Record”. This will set the Zap to trigger whenever a new data record is detected in your designated SpreadsheetWeb application.
- After selecting the trigger, you will need to specify which user account, workspace, and application you want to monitor for new data records.
Step 3: Setting Up the Action with SpreadsheetWeb Hub
Once your trigger is configured, you need to define the action that will occur when the trigger fires:
- Again, choose “SpreadsheetWeb Hub” as the action app.
- Select the “Calculate” event as your action. This will instruct Zapier to perform calculations using the SpreadsheetWeb API based on the new data it receives.
- You will then be asked to specify the same user, workspace, and application you are working with, ensuring consistency across your workflow.
Step 4: Configuring Inputs and Desired Outputs
With the application specified, you can then define what inputs will be sent to SpreadsheetWeb and what outputs you expect:
- In the setup, you will see sections for inputs and outputs. Here, you can select the relevant fields based on the application’s setup in SpreadsheetWeb.
- Additionally, you can configure events like print and Excel export. These can be set to trigger within the same action, creating documents or spreadsheets as part of the workflow.
Step 5: Handling Outputs, Print, and Excel Exports
After configuring the inputs and outputs, you can also specify what should happen with the results:
- You can select from a list of available outputs, print, Excel export, and email options configured in your SpreadsheetWeb application.

- When the Zap runs, the output section will display the values you’ve chosen to capture.
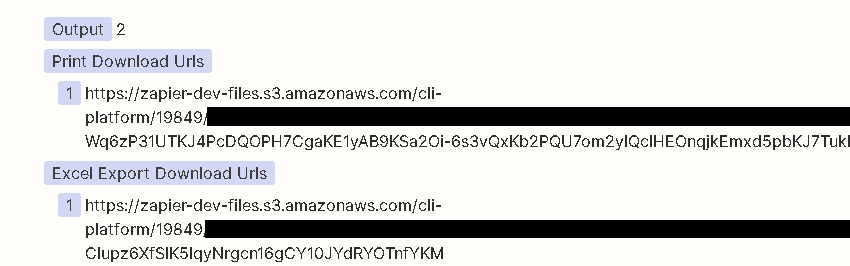
- Additionally, if print, Excel exports, or email events are configured, Zapier will provide URLs to download these files directly from the Zap’s output. If an email event is triggered, it will send an email to the designated recipient with relevant information or links to the processed data.